
Integration
Step-by-step guide for uploading documents from MeridianLink Mortgage and reviewing Ocrolus-powered income, insights, and data import.
This guide covers the end-to-end workflow for using the Ocrolus integration within MeridianLink Mortgage. The integration allows loan officers to upload borrower documents directly from MeridianLink, have them automatically processed and classified by Ocrolus, and then import verified income calculations and insights back into MeridianLink.
Review the workflow summary on the Overview page before following these steps. The summary outlines the six stages of the integration, from accessing the loan pipeline in MeridianLink to confirming imported data, and provides useful context for the steps below. For more information, see the Integration workflow.
Follow these steps to upload borrower documents, review Ocrolus-powered income calculations and insights, and import verified data back into MeridianLink:
Step 1: Access your loan pipeline
Log in to MeridianLink Mortgage. From the Home menu, your loan pipeline displays all active loans assigned to you. Each row shows the loan number, borrower name, loan officer, loan status, rate lock status, and estimated close date.
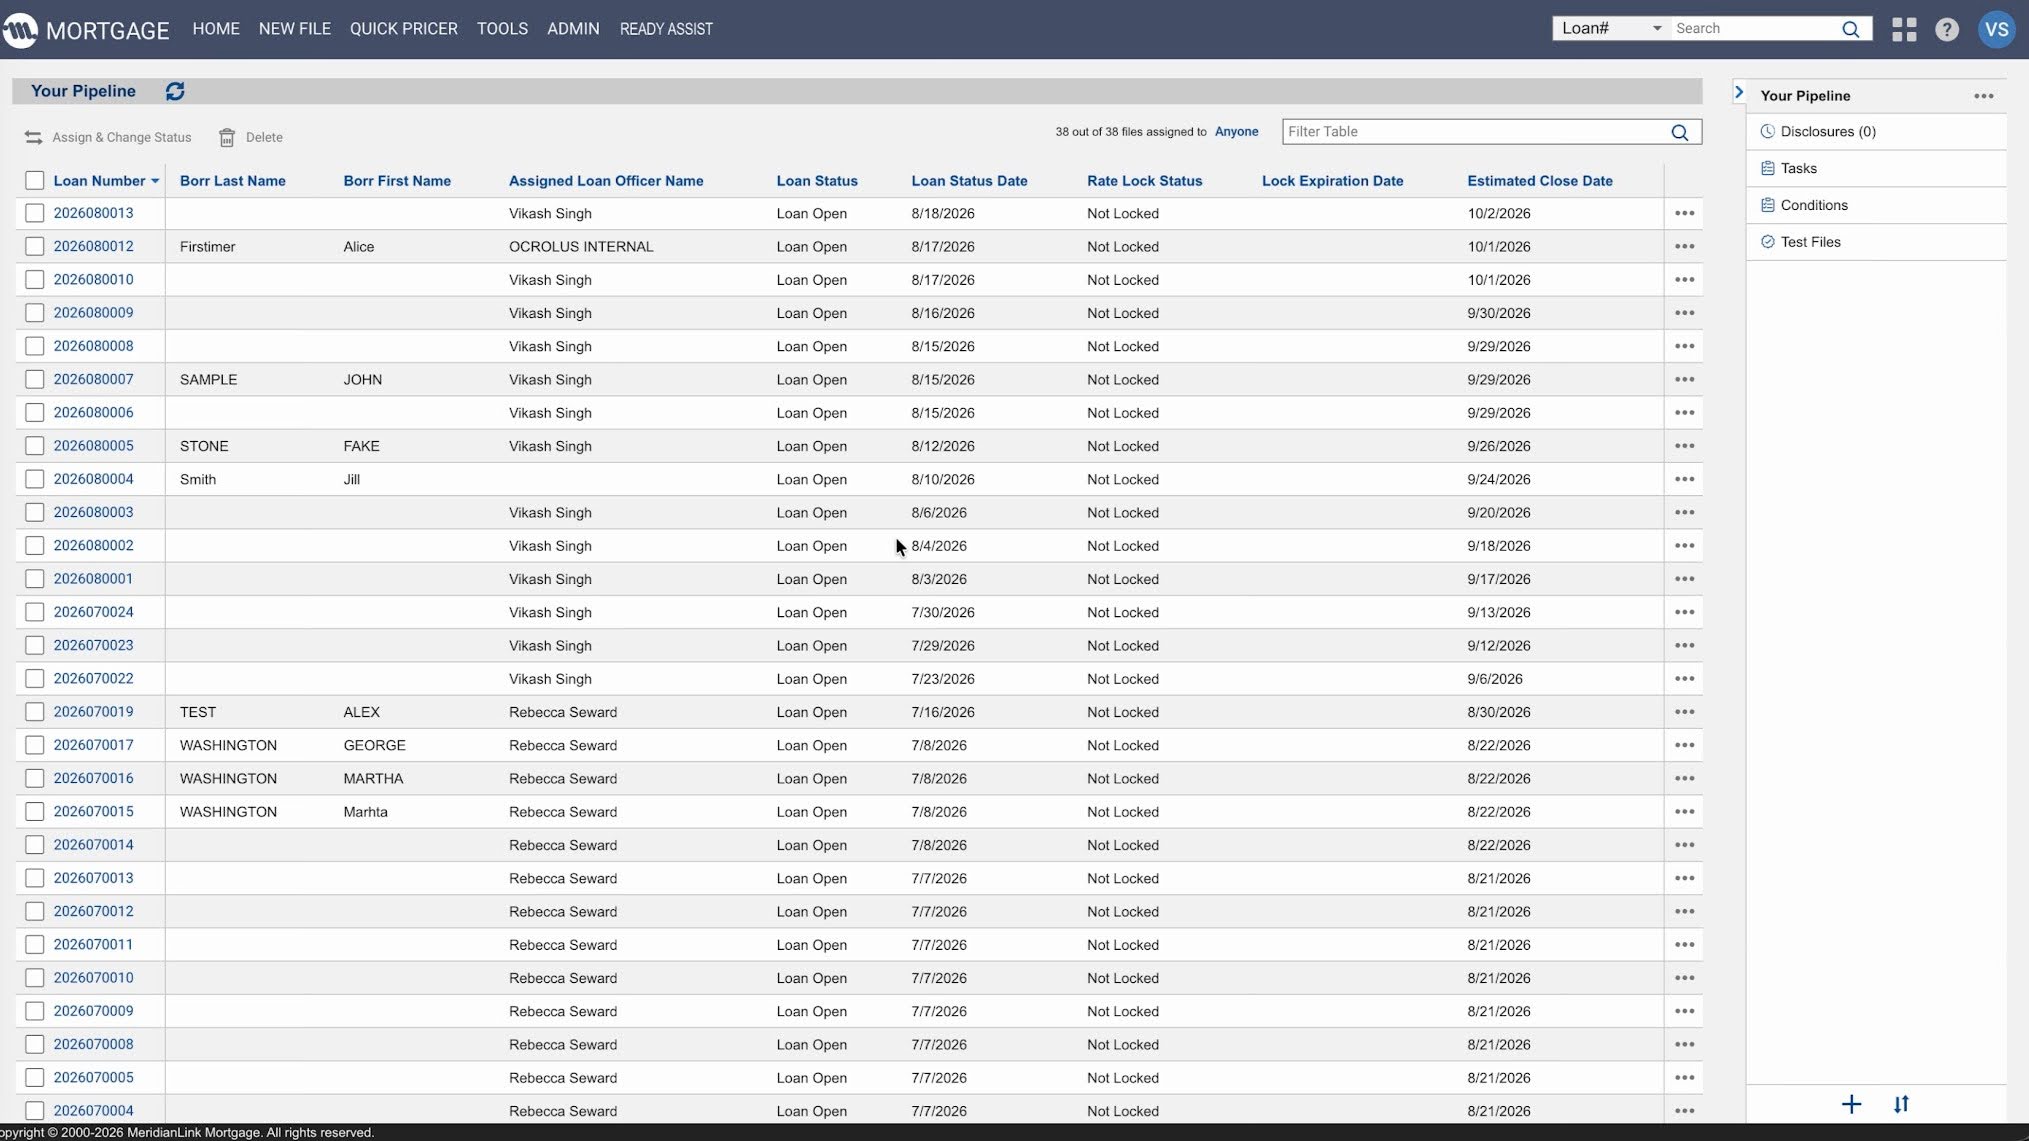
TipUse the Filter Table search box in the top-right corner of the pipeline view to find a specific loan.
Step 2: Create a new loan
Click NEW FILE in the top navigation bar and then select Loan to open a new mortgage loan file.
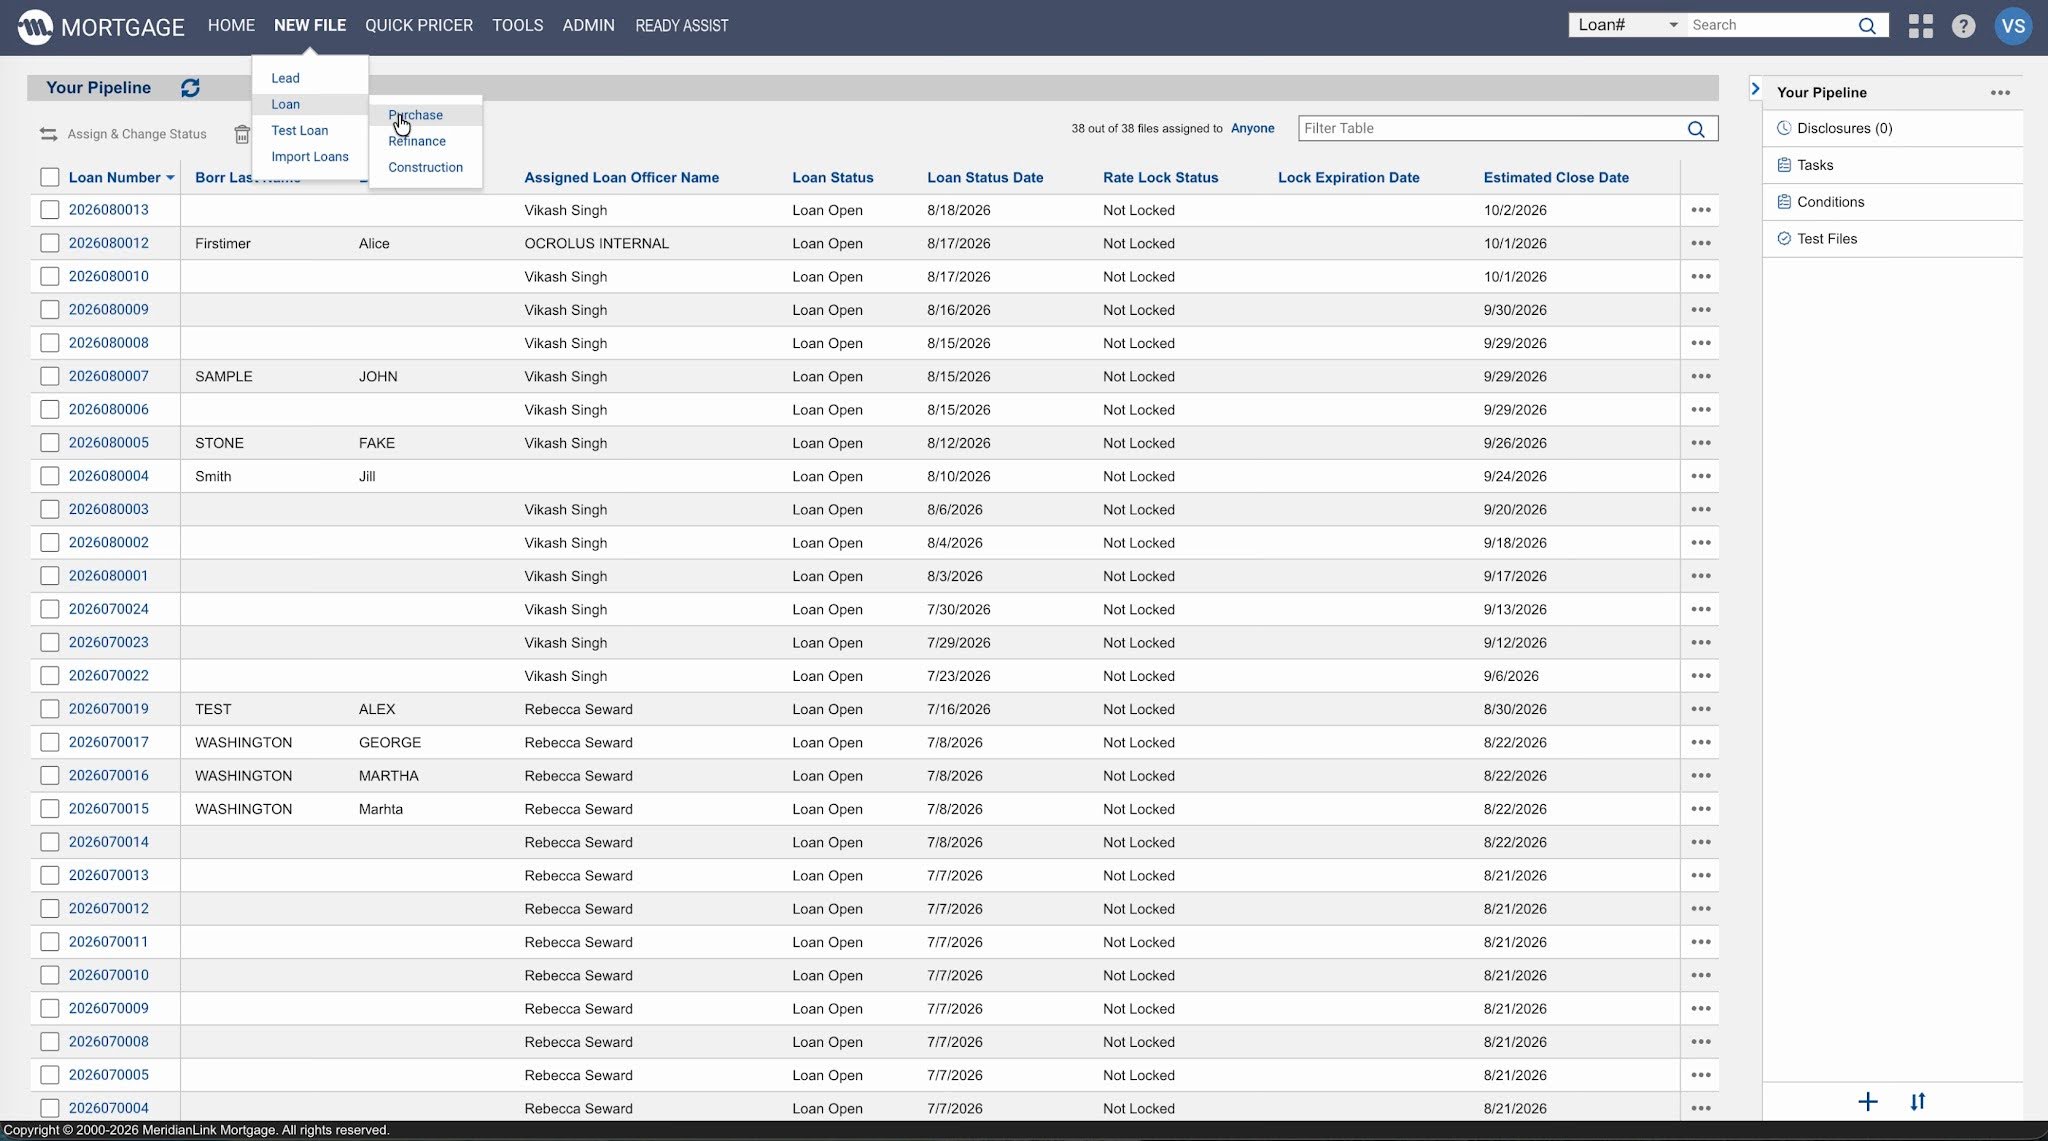
TipFor demo or testing purposes, select Test Loan to create a loan that does not affect live reporting.
Step 3: Review loan navigation
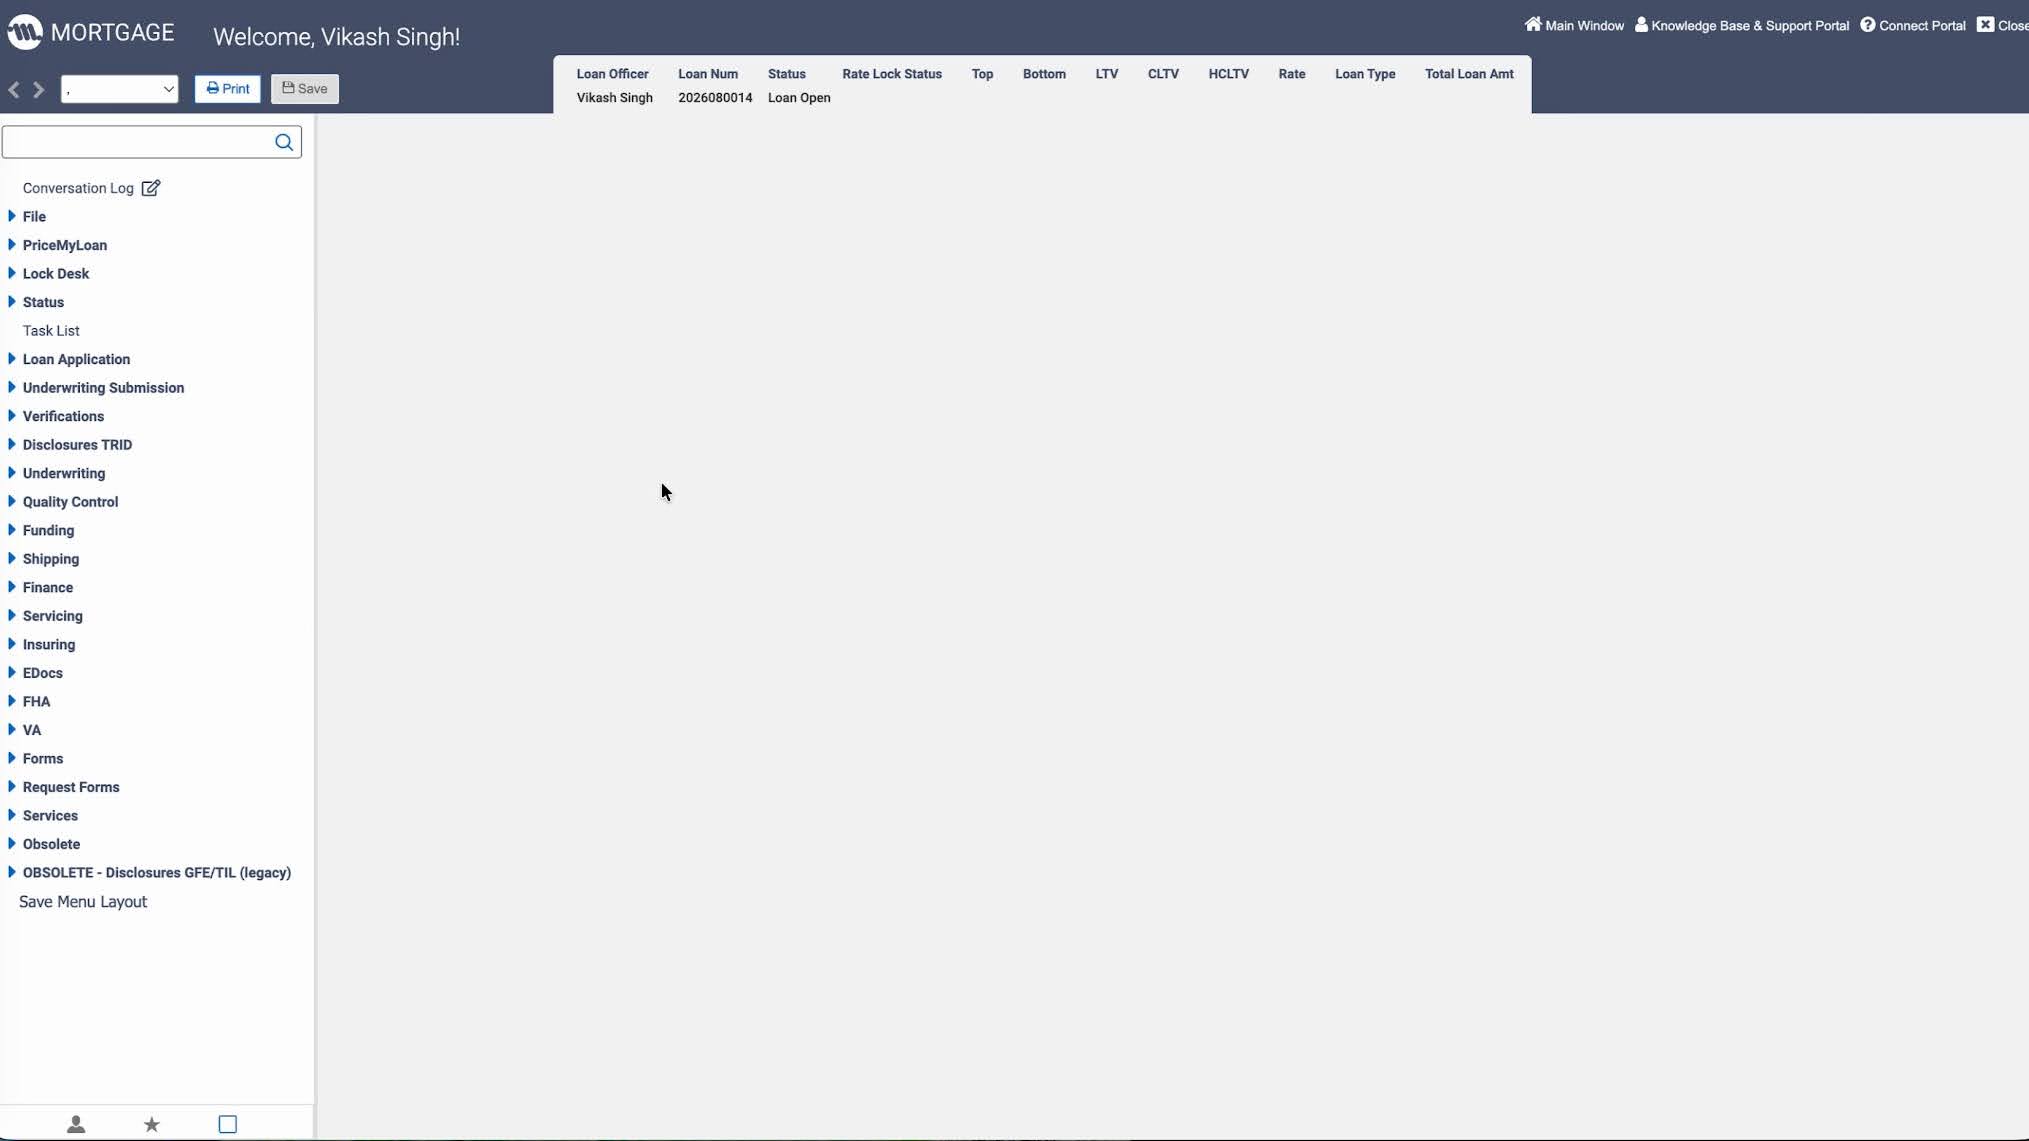
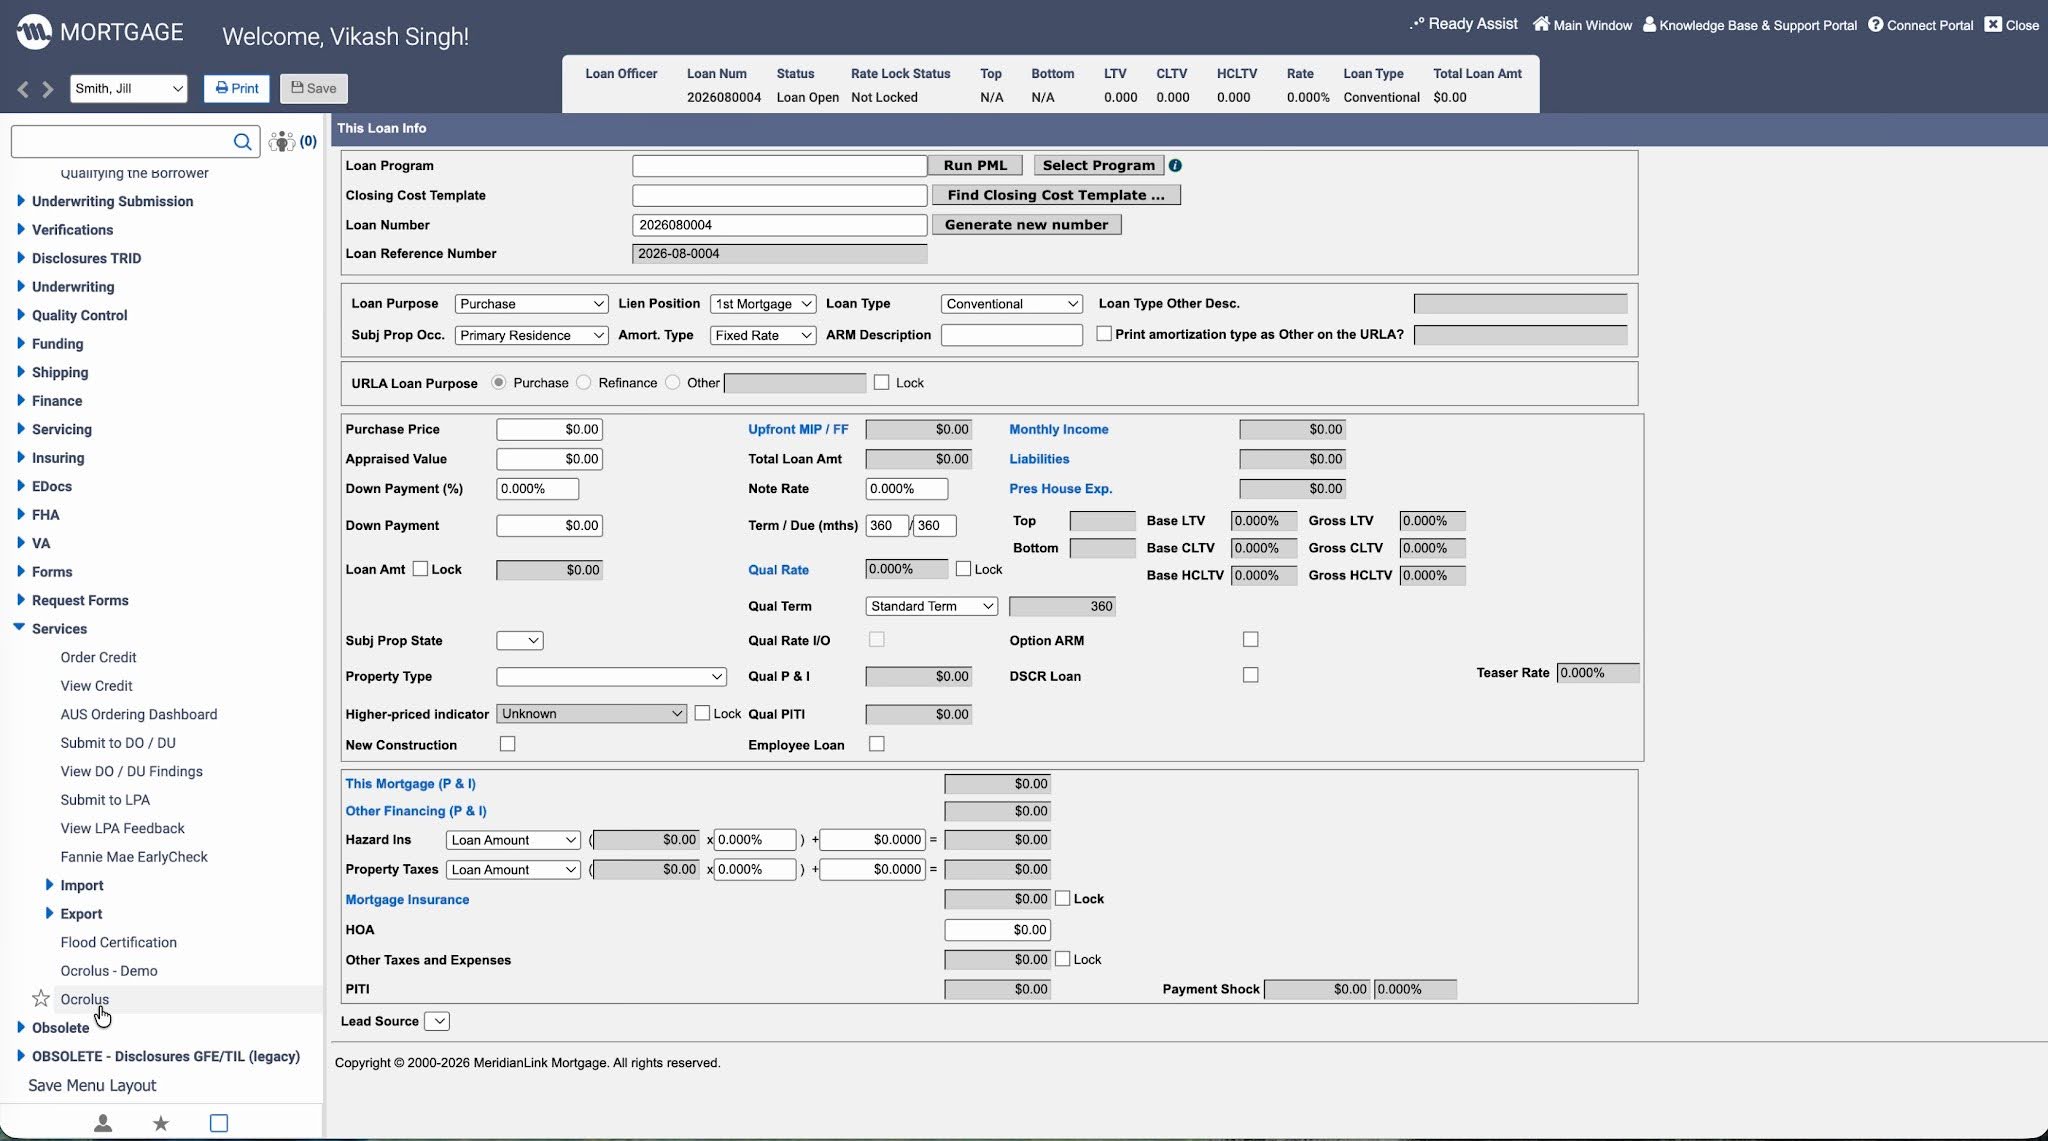
Once a loan is created, you land on the loan file. The left-hand navigation panel provides access to all sections such as Conversation Log, Loan Application, Underwriting Submission, Verifications, Disclosures TRID, Underwriting, Quality Control, Funding, Shipping, Finance, Servicing, and eDocs. The top bar shows the Loan Officer, Loan Number, Status, LTV, and Loan Amount. Use the Loan Number to locate a loan in Ocrolus.
Step 4: Upload documents
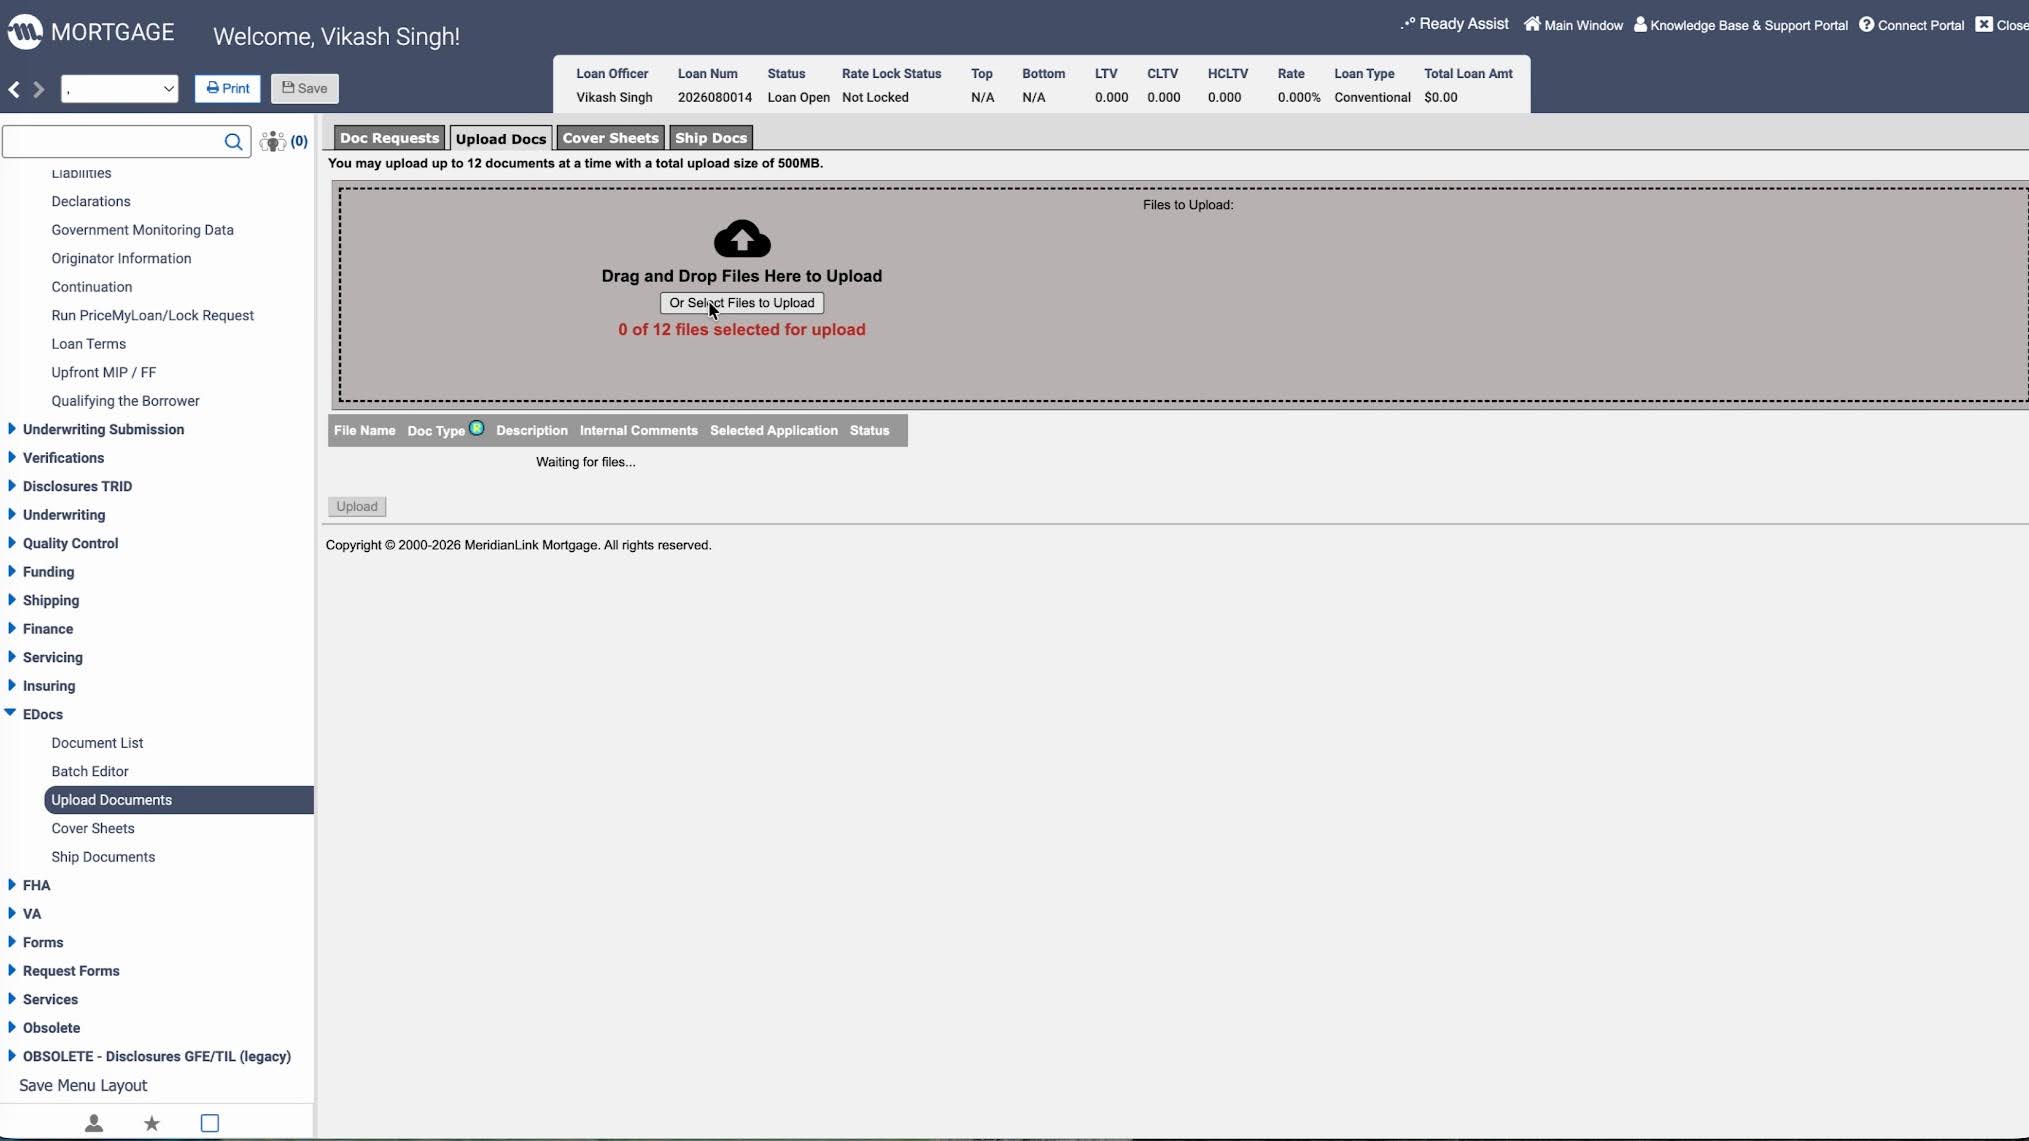
In the left navigation, click eDocs, then select Upload Documents. A drag-and-drop upload area appears. Upload up to 12 documents at a time, with a maximum total size of 200 MB. All uploaded documents are automatically routed to Ocrolus for processing and classification.
Step 5: Select the Ocrolus document folder
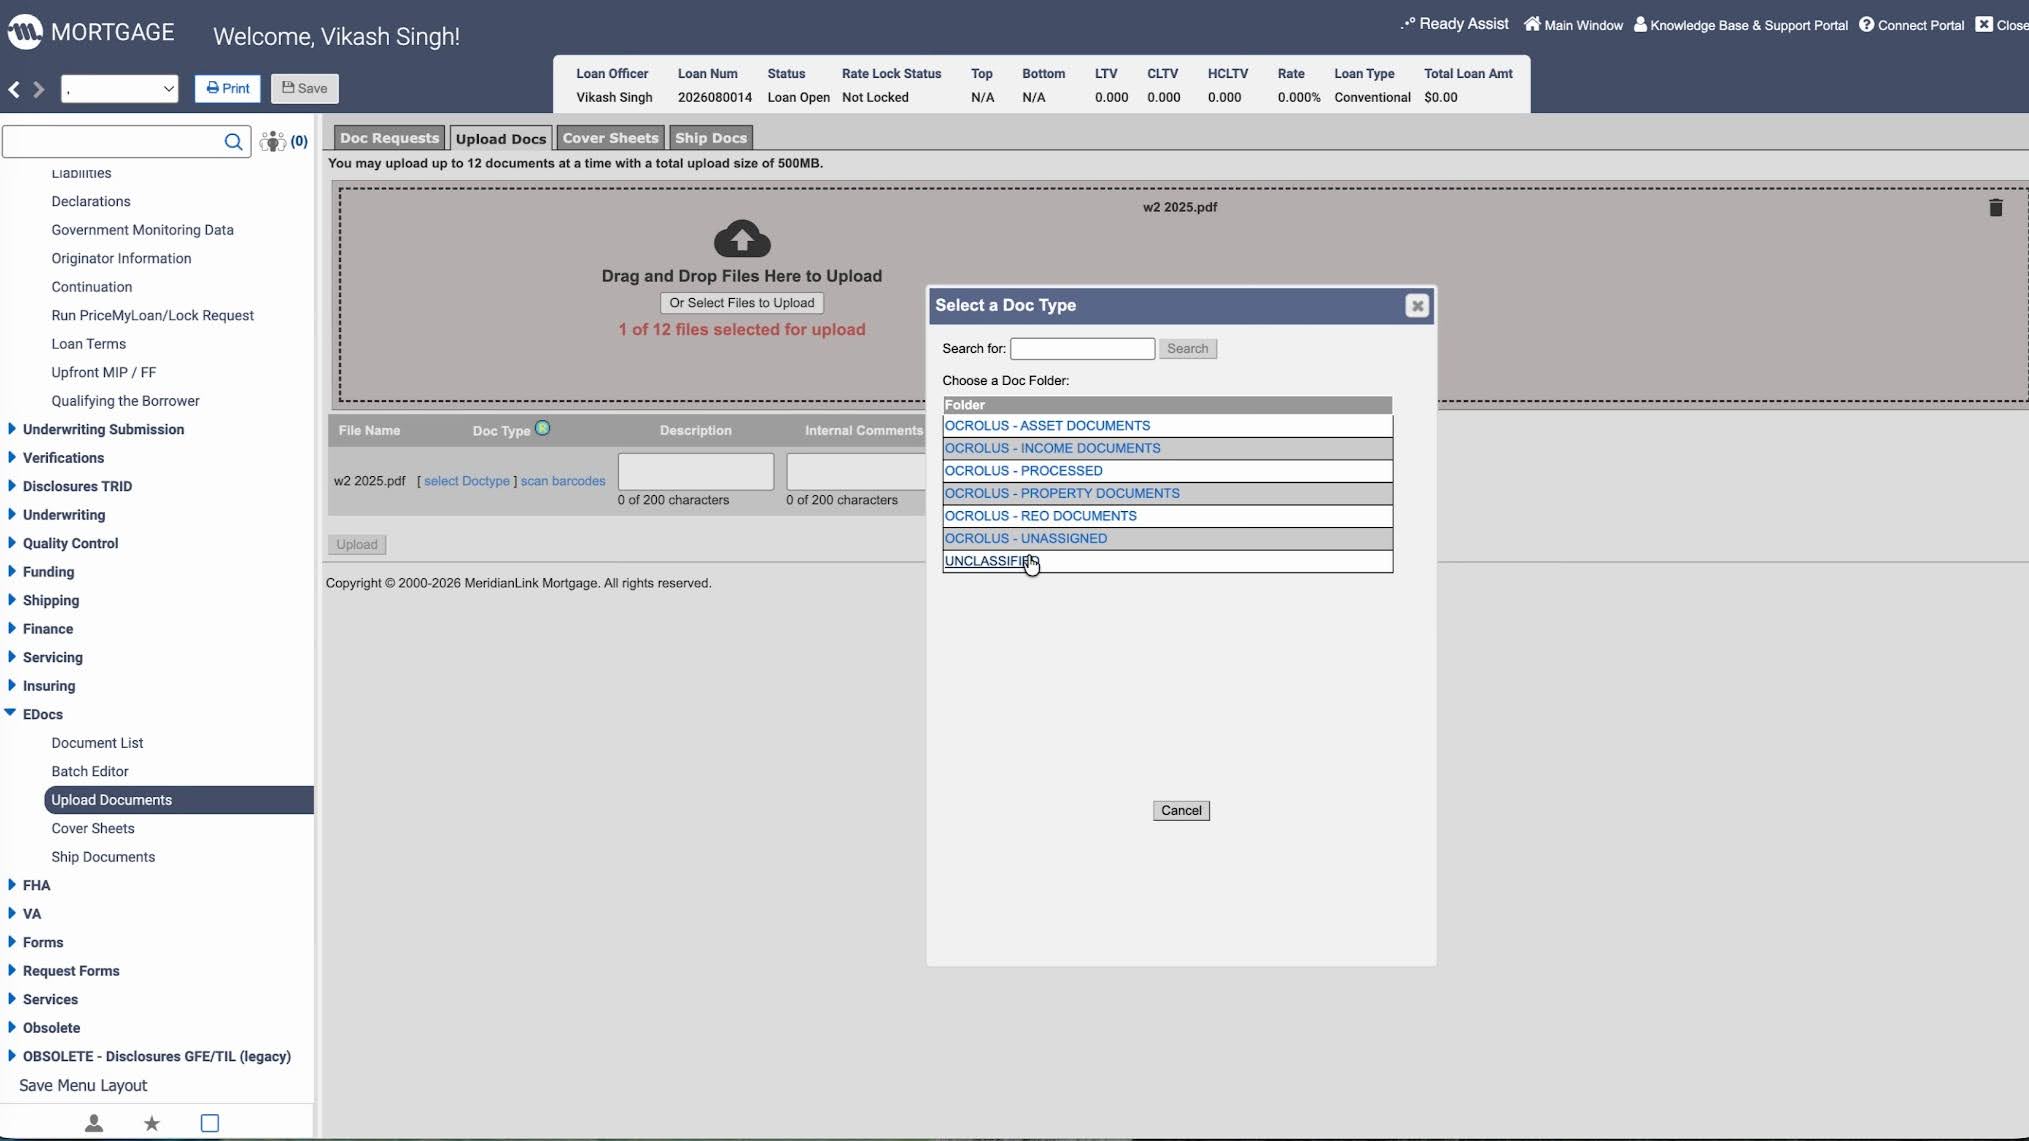
After selecting your files, click the Doc Type field for each document. A Select a Doc Type modal appears. Under Choose a Doc Folder, the following Ocrolus-specific folders appear:
- OCROLUS - ASSET DOCUMENTS
- OCROLUS - INCOME DOCUMENTS
- OCROLUS - PROCESSED
- OCROLUS - PROPERTY DOCUMENTS
- OCROLUS - REO DOCUMENTS
- OCROLUS - UNASSIGNED
- UNCLASSIFIED
Select UNCLASSIFIED to let Ocrolus automatically identify, classify, and index the document type.
Step 6: Confirm document upload status
After uploading, navigate to the Electronic Docs list within MeridianLink. The document initially appears with a status of OCROLUS - PROCESSED, confirming it has been successfully transmitted to Ocrolus and is now in the processing queue.
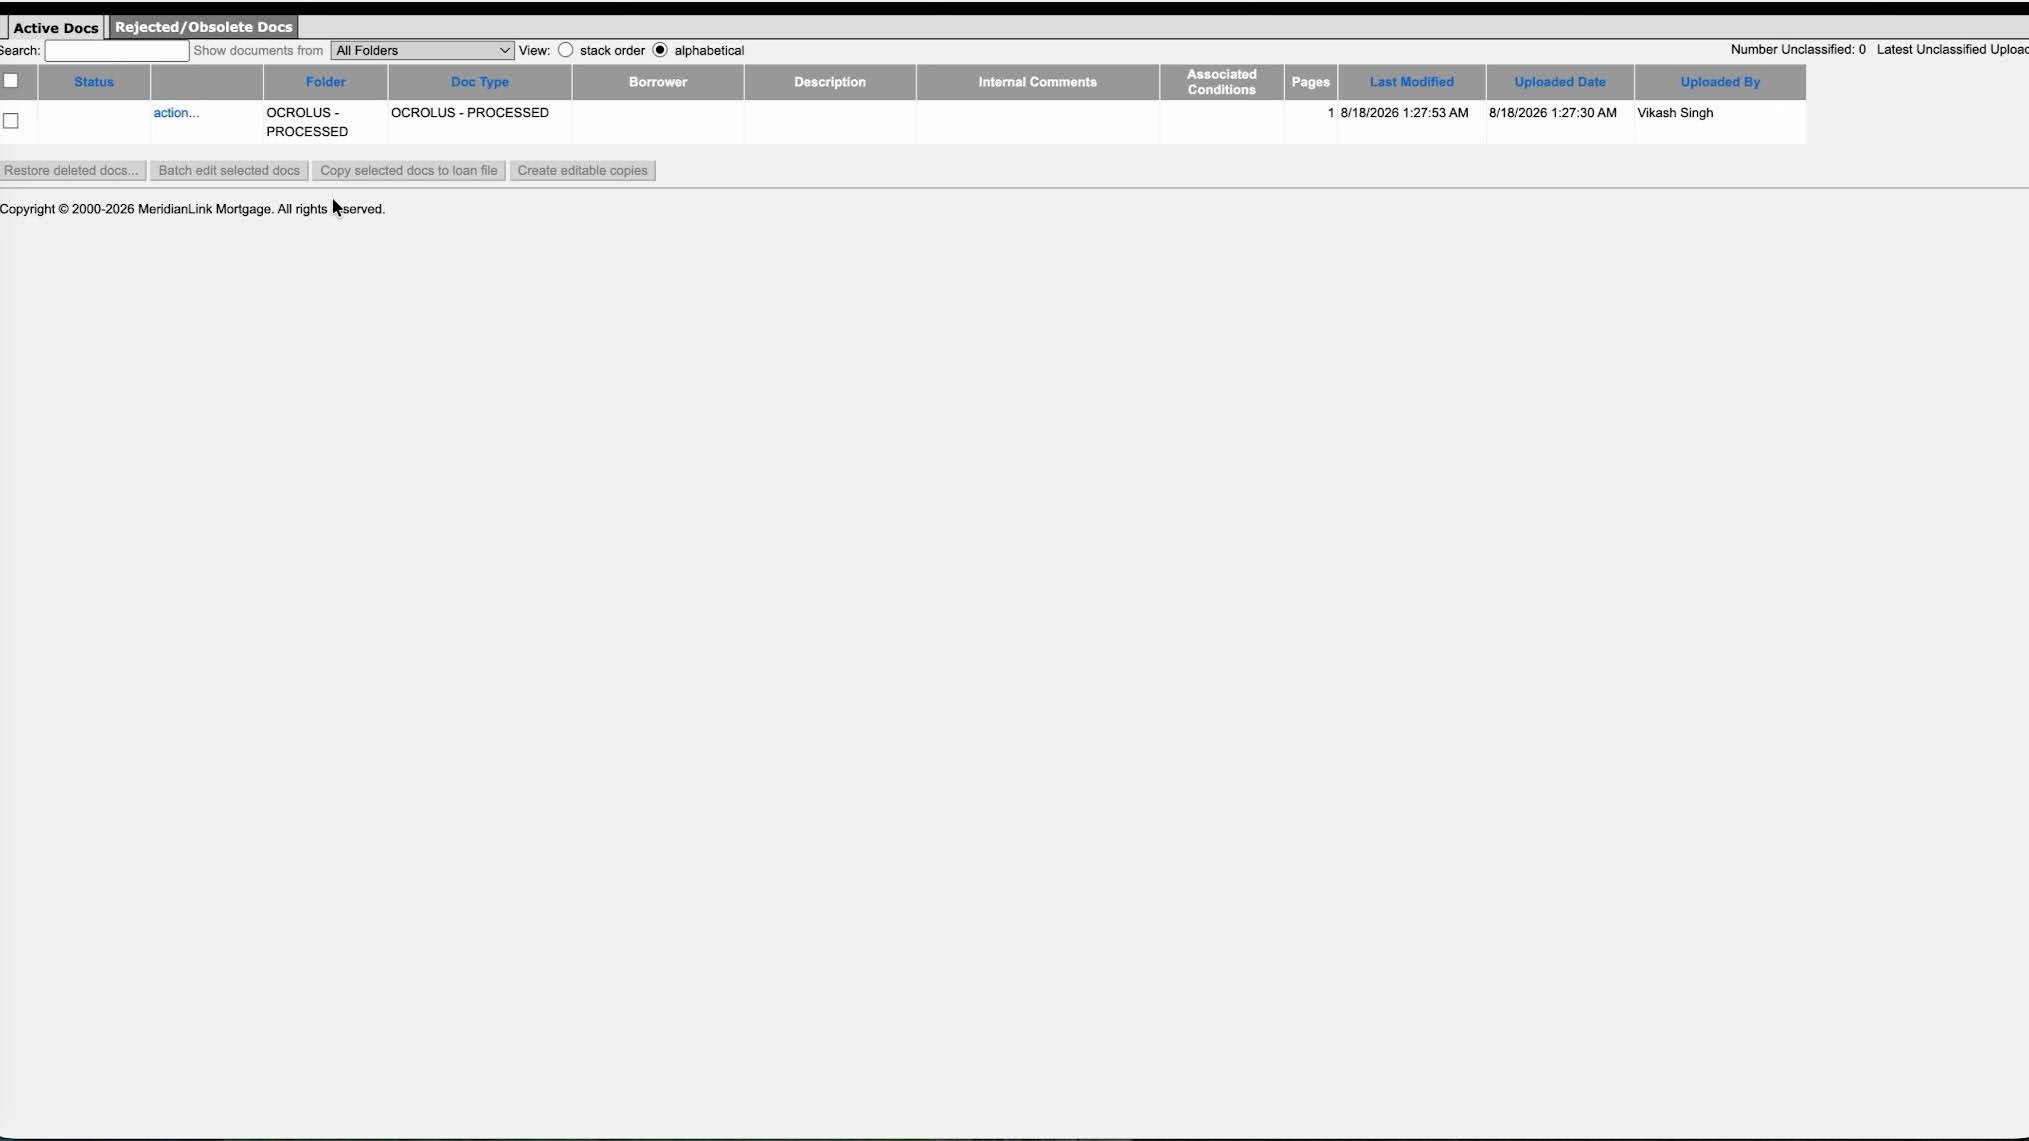
TipIf the status shows as UNCLASSIFIED, the document may still be processing. Refresh the page after a few minutes.
Step 7: View classified documents in Ocrolus
Once processing is complete, open the loan in the Ocrolus Dashboard.
In the left sidebar, navigate to the Index section. Ocrolus automatically classifies and groups documents by type and displays a list of all identified document types, for example, 1040 (2024), 1040 Schedule I, Schedule C, Schedule E, 1120S, W-2, pay stubs, Purchase Contract, Verification of Employment, and Loan Estimate. The sidebar also provides navigation to Uploads, Index, Income, Inspect, Accounts, Transactions, and Detect Signals..
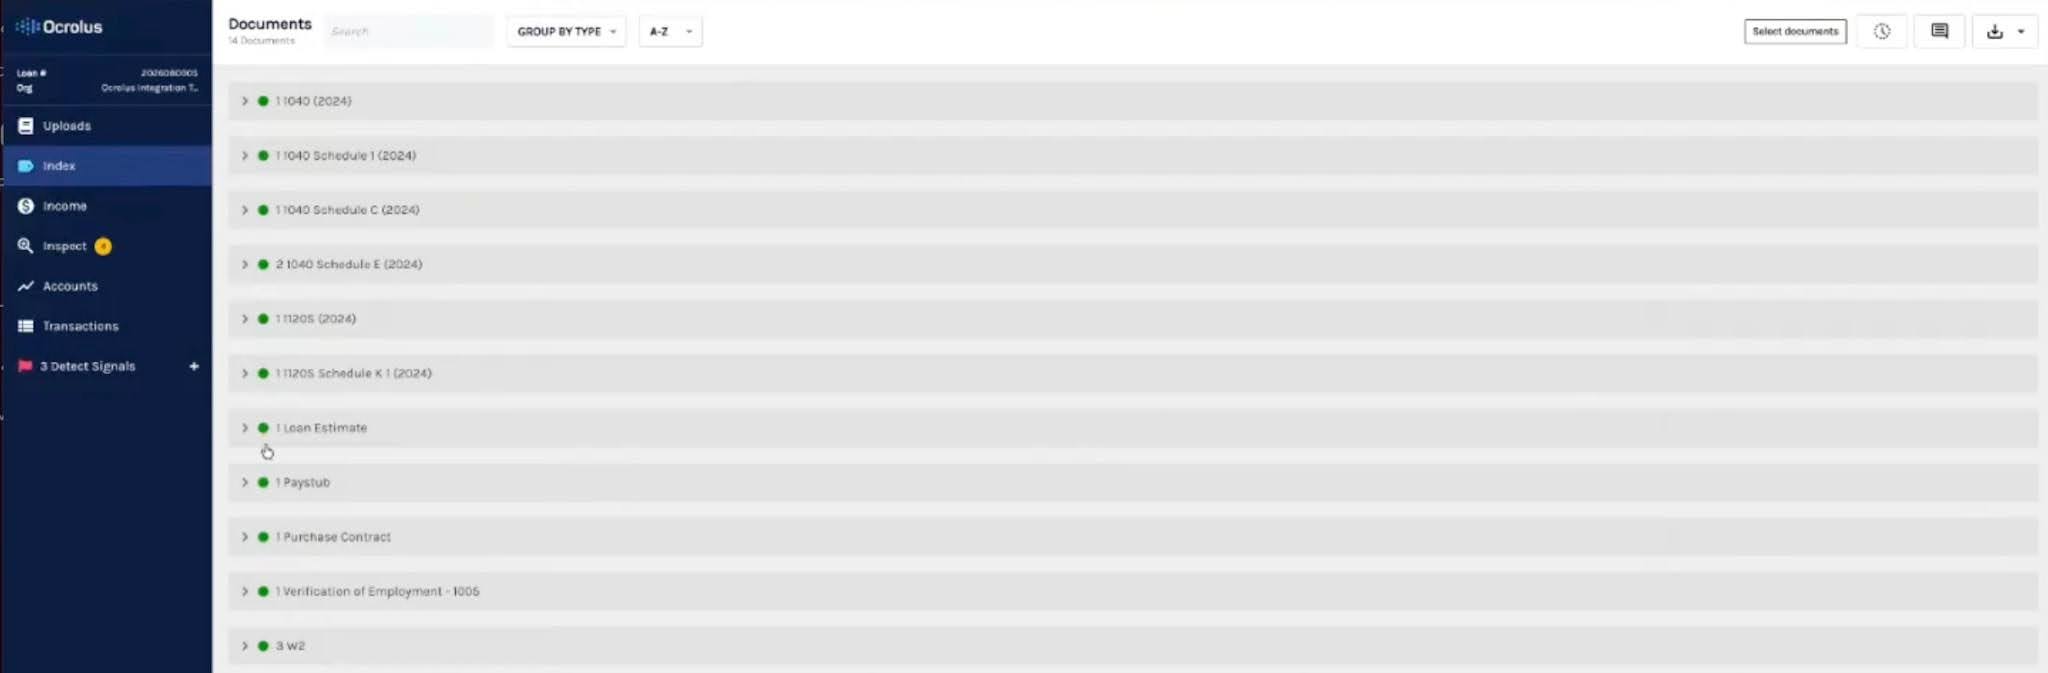
TipGreen circles next to each document type indicate successful classification. If a document shows as Unclassified, it may need manual review.
Step 8: Review wage earner income calculations
In the left sidebar, click Income and select the Wage Earner tab. Ocrolus automatically calculates monthly income based on Fannie Mae or other agency guidelines. For each borrower, you can review:
- Hourly income
- Overtime income
- Earnings by year
- Monthly income calculations
- The recommended income figure, highlighted in blue
Multiple calculation methods are available, including YTD average, 1-year average, 2-year average, and past year. Once you have reviewed and confirmed the calculation, click IMPORT TO MERIDIAN LINK to push the income data back to the loan file.
The Summary tab provides a consolidated view of all income sources across borrowers. The Self-Employed, Rental, and Other tabs are also available for additional income types.
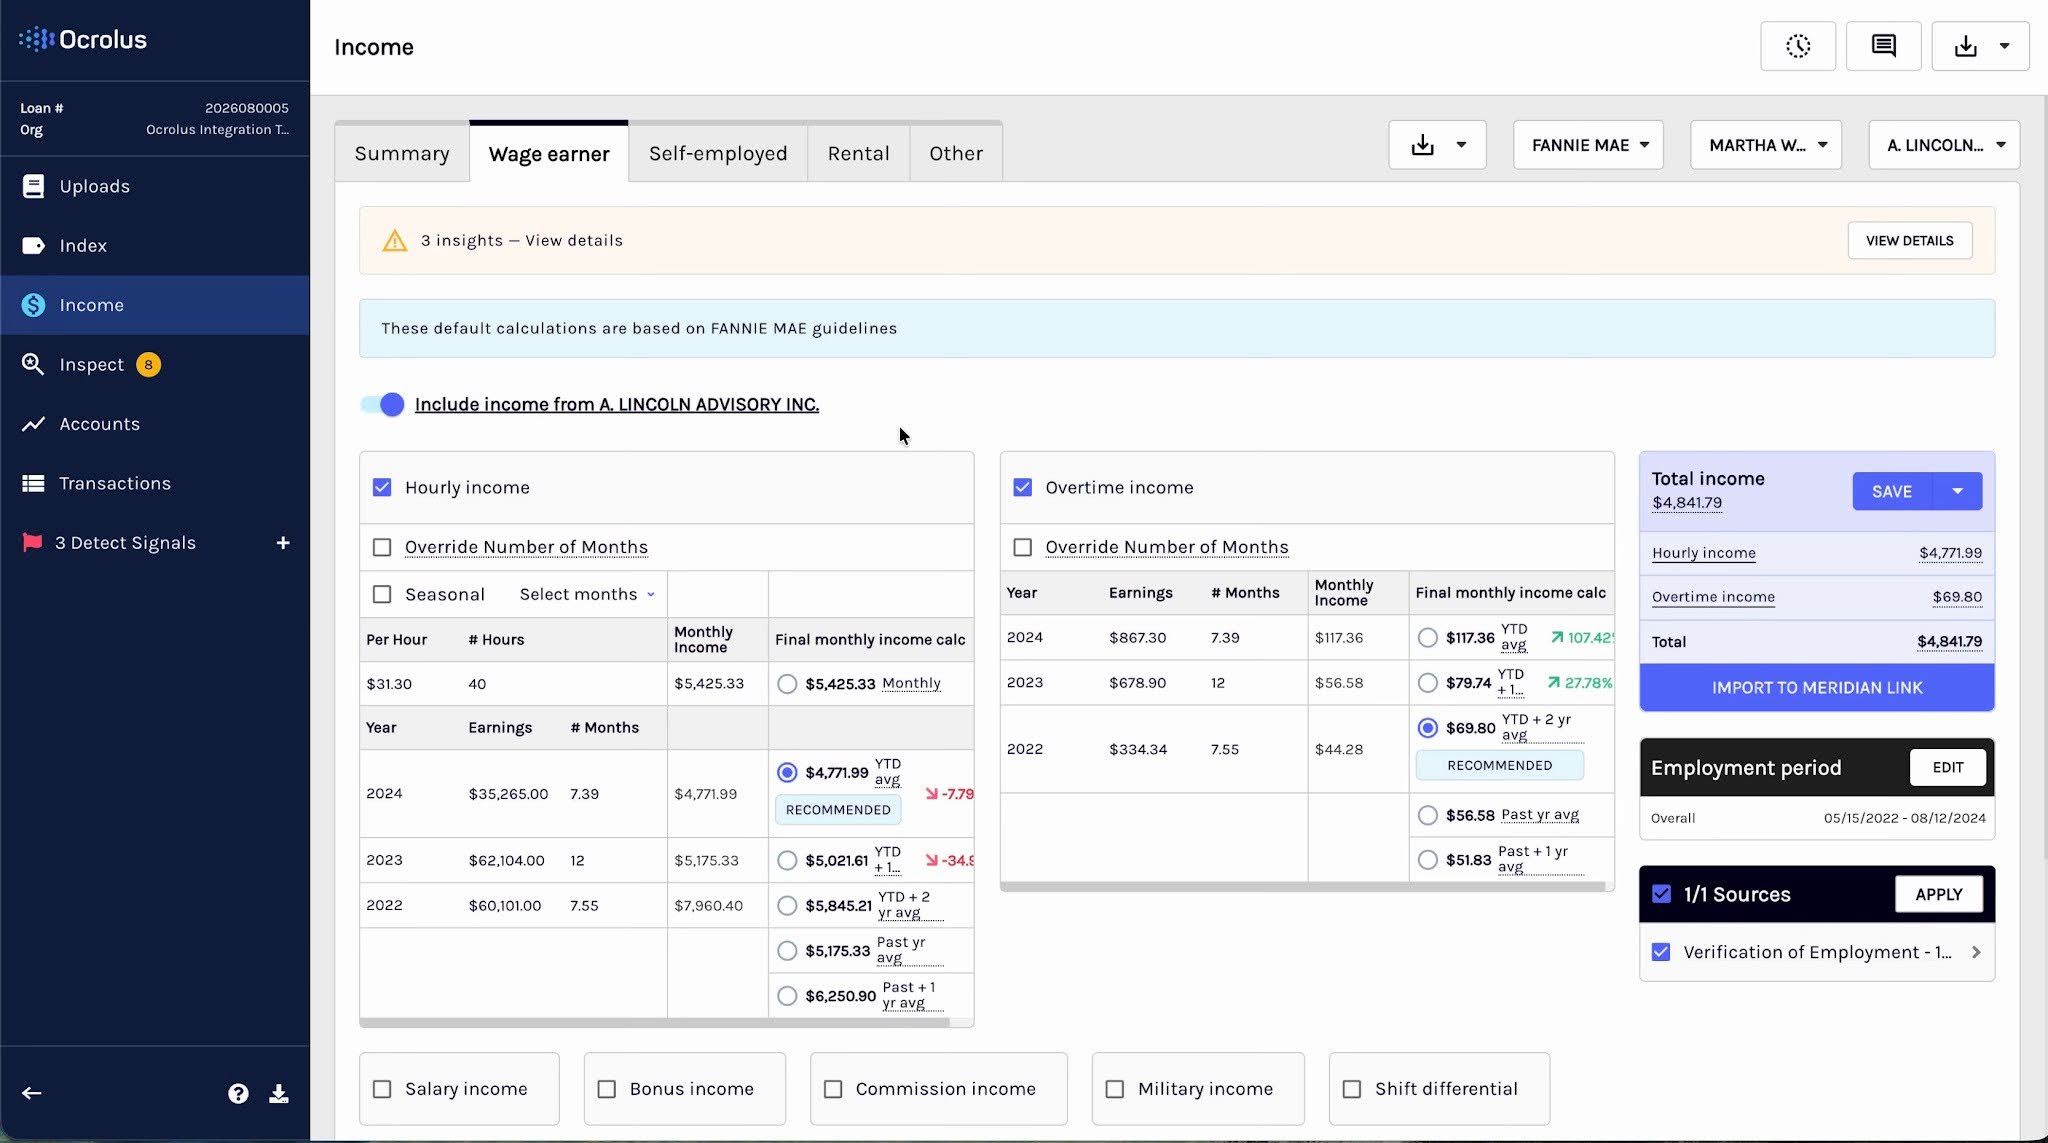
TipThe Recommended tag indicates the Ocrolus-suggested income figure based on the selected agency guideline. You can override this by selecting a different calculation method before importing.
Step 9: Review rental income
Click the Rental tab within the Income section. Ocrolus identifies rental properties from Schedule E and other tax documents and calculates net income. The right panel shows total net income and the applicable Fannie Mae calculation. Source documents, including 1040 Schedule E, 1040, and 1040 Schedule I, are listed with checkboxes. When ready, click IMPORT TO MERIDIAN LINK to push the rental income to the borrower's file.
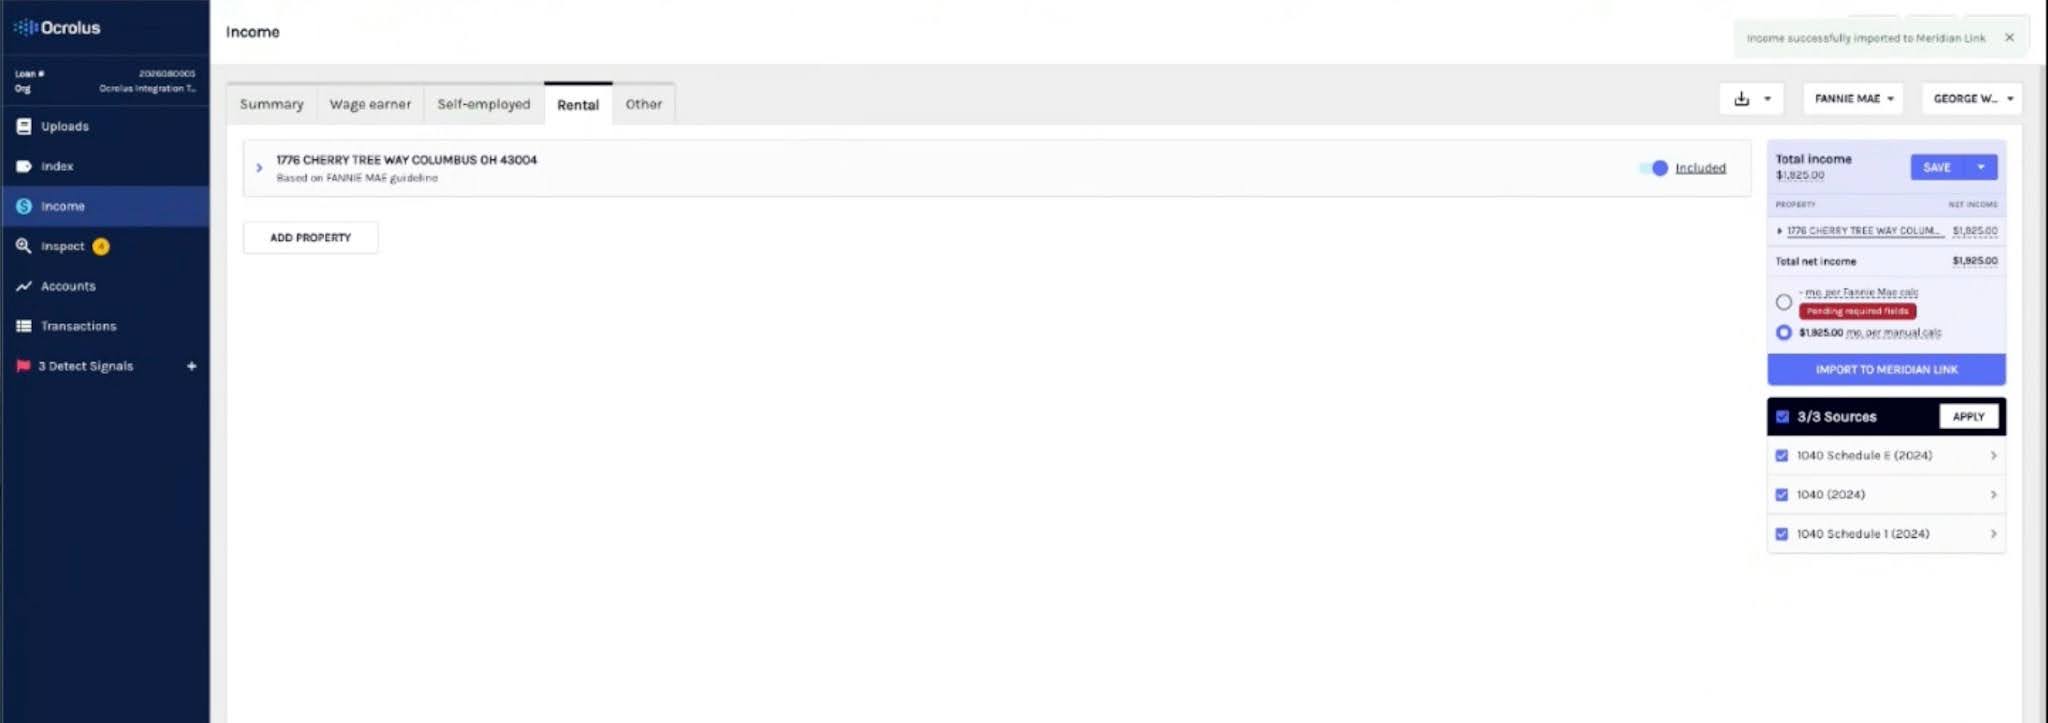
NoteUse the Add Property button to add a rental property manually if one is not automatically detected.
Step 10: Review insights in Ocrolus Inspect
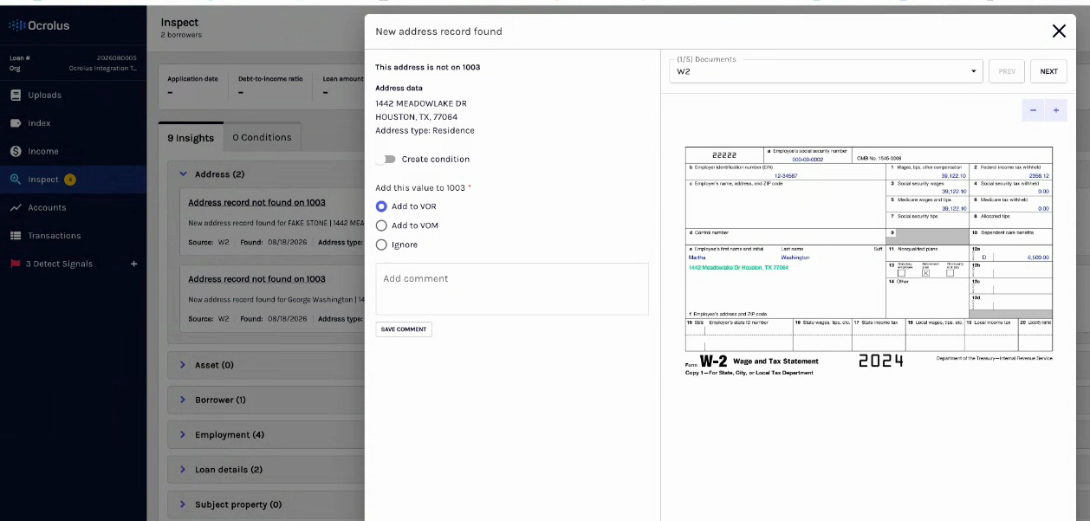
Navigate to the Inspect section in the left sidebar. Ocrolus surfaces actionable insights and potential conditions identified from the documents. Insights are grouped by category: Address, Asset, Borrower, Employment, Loan Details, and Subject Property.
Click any insight to open a detail modal showing the relevant document, the identified discrepancy, and the following options: Add to VOR, Add to VOM, Ignore, and Create Condition. You can add comments and mark each insight as reviewed or flag it for later review.
Insights flagged as conditions can be exported directly to your AUS system. Use the Conditions tab next to Insights to view any conditions already created from the Inspect findings.
Step 11: Review Conditions in Ocrolus Inspect
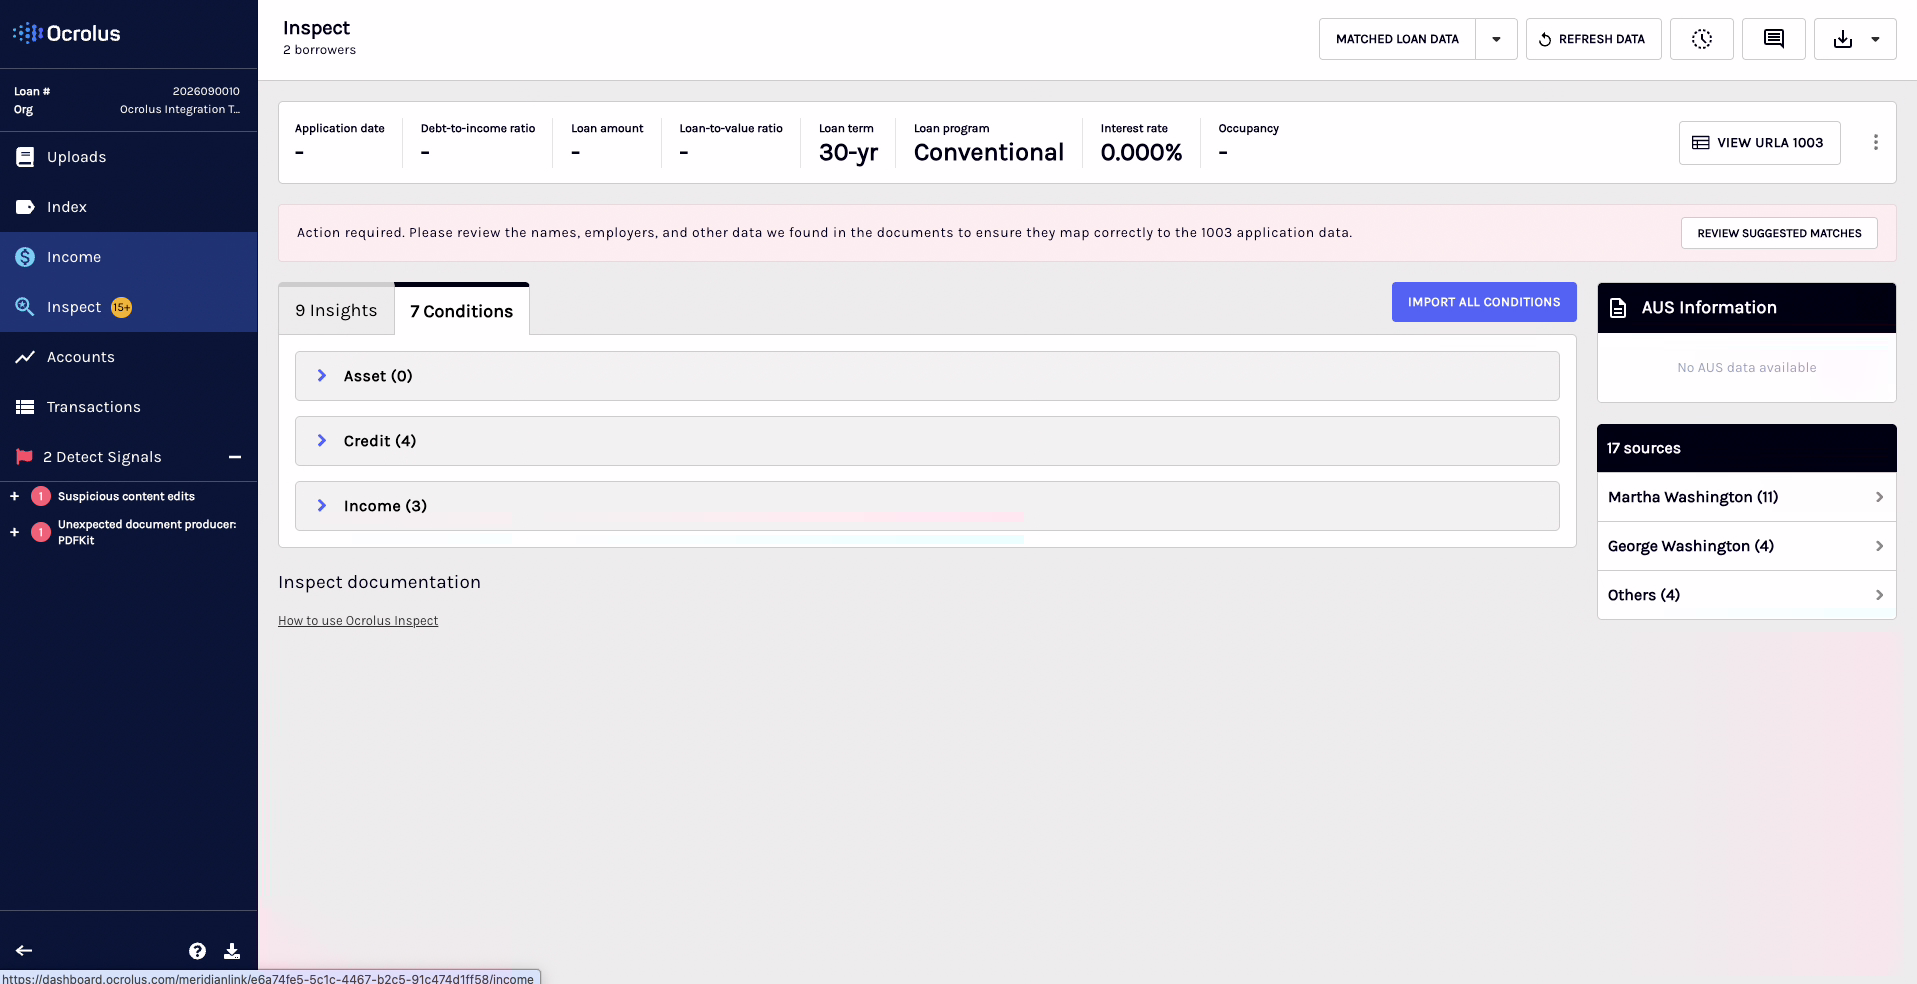
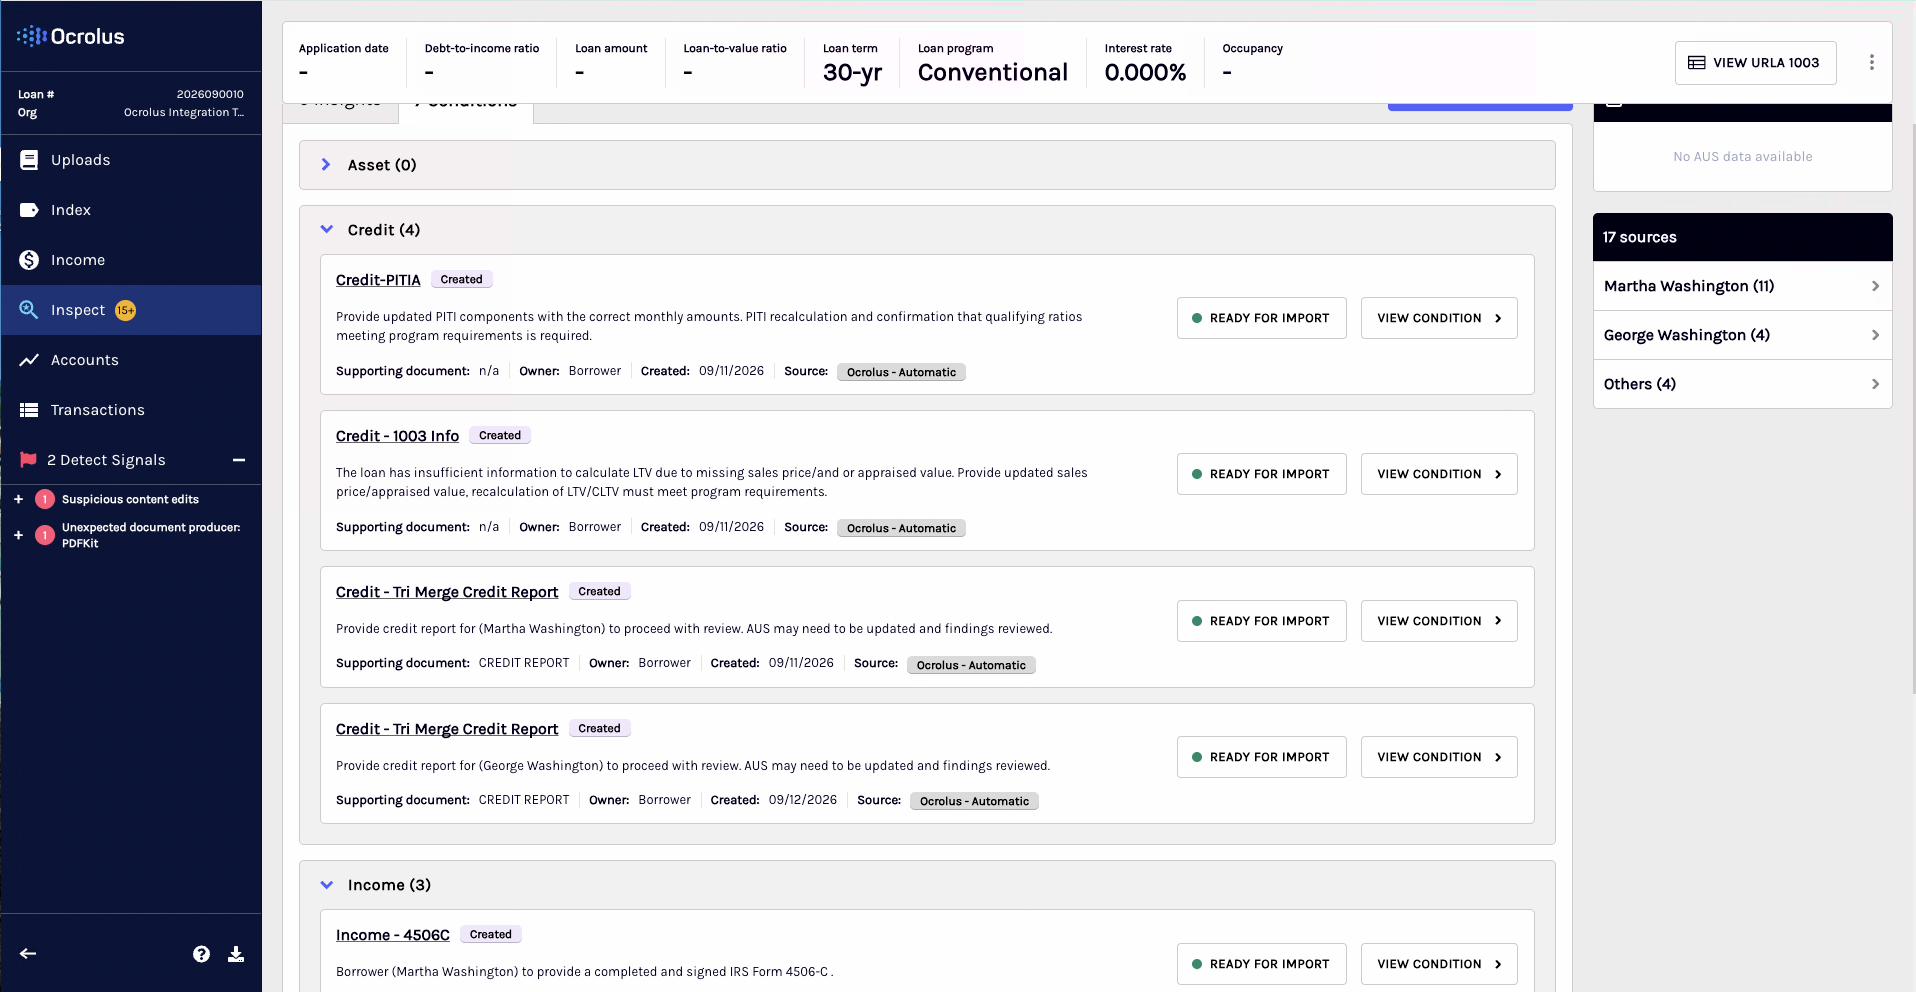
Navigate to the Conditions tab in the Inspect section. Ocrolus automatically generates loan conditions based on the documents reviewed, organized by category such as Asset, Credit, and Income.
Each condition card displays the following:
- Condition name and a status badge. For example, Created
- Description of what is required to satisfy the condition
- Supporting document type, owner, creation date, and source (labeled as Ocrolus - Automatic)
Click VIEW CONDITION to see full details for any condition, or click READY FOR IMPORT to mark it for export to your AUS system. To push all conditions at once, click IMPORT ALL CONDITIONS in the top-right corner of the tab.
TipThe right-hand panel displays AUS Information and a breakdown of sources by borrower. If AUS data is not yet available, the panel shows No AUS data available. You can still review and import conditions independently.
Step 12: Review Detect Signals
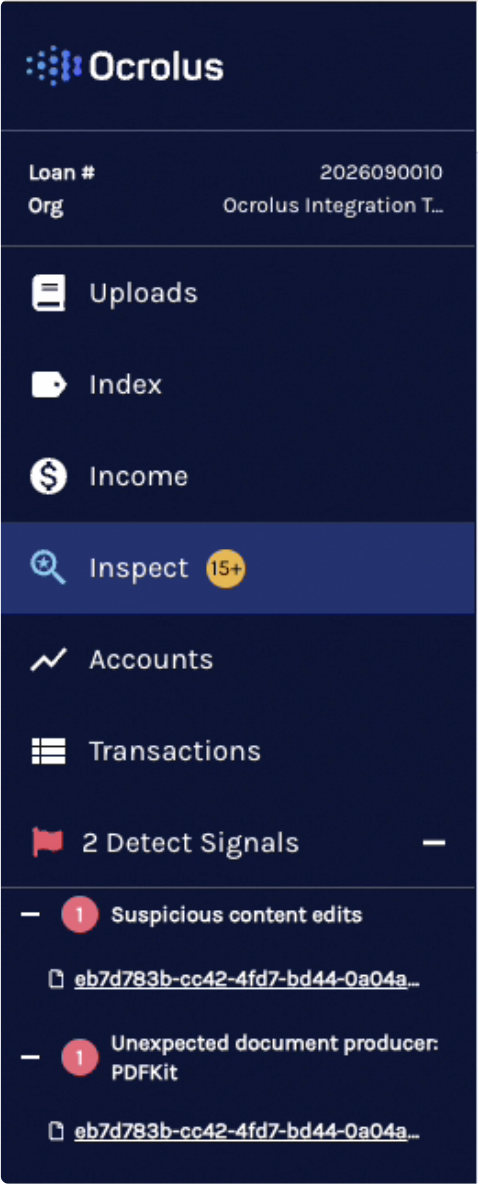
Before importing data back to MeridianLink, review the Detect Signals section in the left sidebar, indicated by a red flag icon. Ocrolus automatically flags any documents that show signs of potential fraud or manipulation. Each signal type is listed with a count badge indicating how many documents triggered that signal. Click any signal type to expand it and view the specific documents affected, identified by their document UUID.
NoteDetect Signals are surfaced automatically by Ocrolus's fraud detection engine and do not require manual activation. If no signals appear, all documents pass fraud validation. Review any flagged documents carefully before proceeding with the import.
Step 13: Preview and import data to MeridianLink
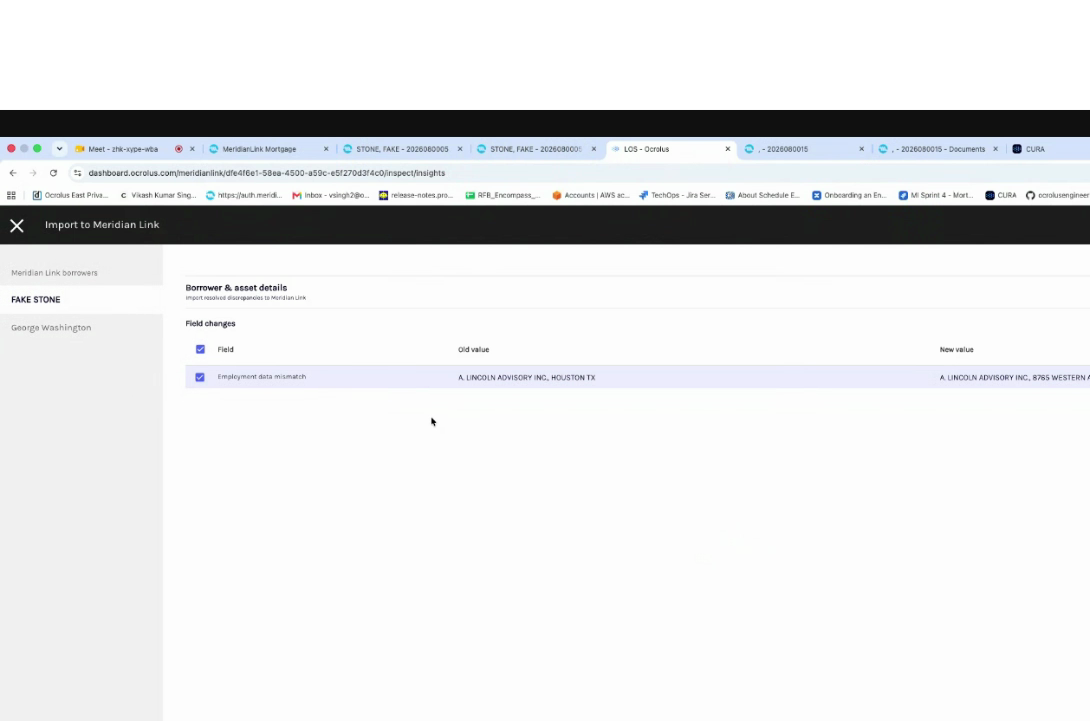
From within the Inspect or Income section, click IMPORT TO MERIDIAN LINK. A preview screen appears showing the exact field changes that will be written back to MeridianLink. For each borrower shown in the left sidebar, the table displays:
- Field: The field name
- Old value: The current value in MeridianLink
- New value: The value from Ocrolus
Only checked fields are imported. Uncheck any fields you do not want to update before clicking Import. Review all proposed changes carefully before clicking Import in the top-right corner.
Step 14: Confirm updated data in MeridianLink
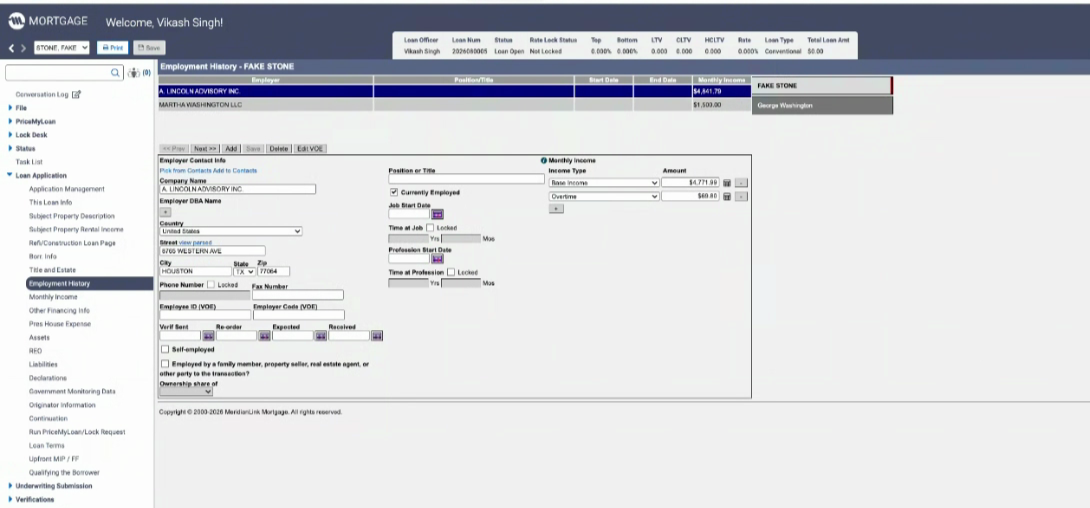
After clicking Import, return to MeridianLink. Navigate to the relevant section, for example, Loan Application > Employment History. The borrower's record reflects the updated data imported from Ocrolus, including the corrected employer address and income figures. All imported values are visible in their respective MeridianLink fields.
Always verify the imported data in MeridianLink after the import to confirm all fields were updated correctly.
Updated 9 days ago