
Ocrolus API flow
Leverage the Ocrolus APIs to embed Docs-to-Digital into your own systems. This method lets you upload Plaid JSON and bank statement data to a Book, trigger automated matching, and retrieve insights programmatically. By following the steps below, you can compare digital (Plaid) and analog (PDF) data at scale, receive mismatch notifications, and review detailed results through the API or SMB Excel export.
PrerequisiteBefore you begin, make sure you’ve completed all the requirements listed in the Prerequisites section.
To use the API approach, perform the following steps:
Step 1: Upload transaction data
To upload Plaid transaction data to a Book that contains bank statements, perform the following steps:
-
Use the Upload PDF to Book endpoint or the Upload Mixed Document PDF to Book endpoint to upload bank statements for underwriting the borrower.
-
Complete the underwriting and approval process as usual.
NoteOcrolus will wait at least an hour for you to complete uploading documents to a Book for underwriting. This waiting period ensures you have enough time to upload all necessary documents before Ocrolus begins the matching process.
This waiting period may be adjusted over time.
-
When ready to fund, prompt the borrower to connect their bank account via Plaid.
-
Using your organization's Plaid account, obtain the bank transaction data for the same borrower. Ocrolus supports both Plaid Asset Report JSON and Plaid Transactions JSON formats.
-
Use the Upload Plaid JSON to Book endpoint to upload the retrieved Plaid JSON files to the corresponding Book. Include the query parameter
upload_intent=docs_to_digitalto trigger the Docs-to-Digital algorithm. You can upload multiple JSON files to support multiple bank accounts or extended transaction timelines.Available values for
upload_intentare:-
docs_to_digital: Compares Plaid transactions with bank statement transactions in the Book to detect mismatches. -
add_analytics: Adds transactions from the Plaid JSON to the Book without mismatch detection.
CautionIf
upload_intentis not specified, the system considers default asadd_analytics. To run mismatch detection, you must explicitly setupload_intent=docs_to_digital. -
Step 2: Automatic matching
Once the JSON files are uploaded, Ocrolus automatically performs transaction matching by:
- Comparing Plaid and bank statement data: Ocrolus verifies that both Plaid transactions and bank statement data reference the same underlying bank account within the Book.
- Flagging mismatched transactions: Any discrepancies or mismatched transactions are identified and flagged for review. Notifications are sent via email or webhook for further action.
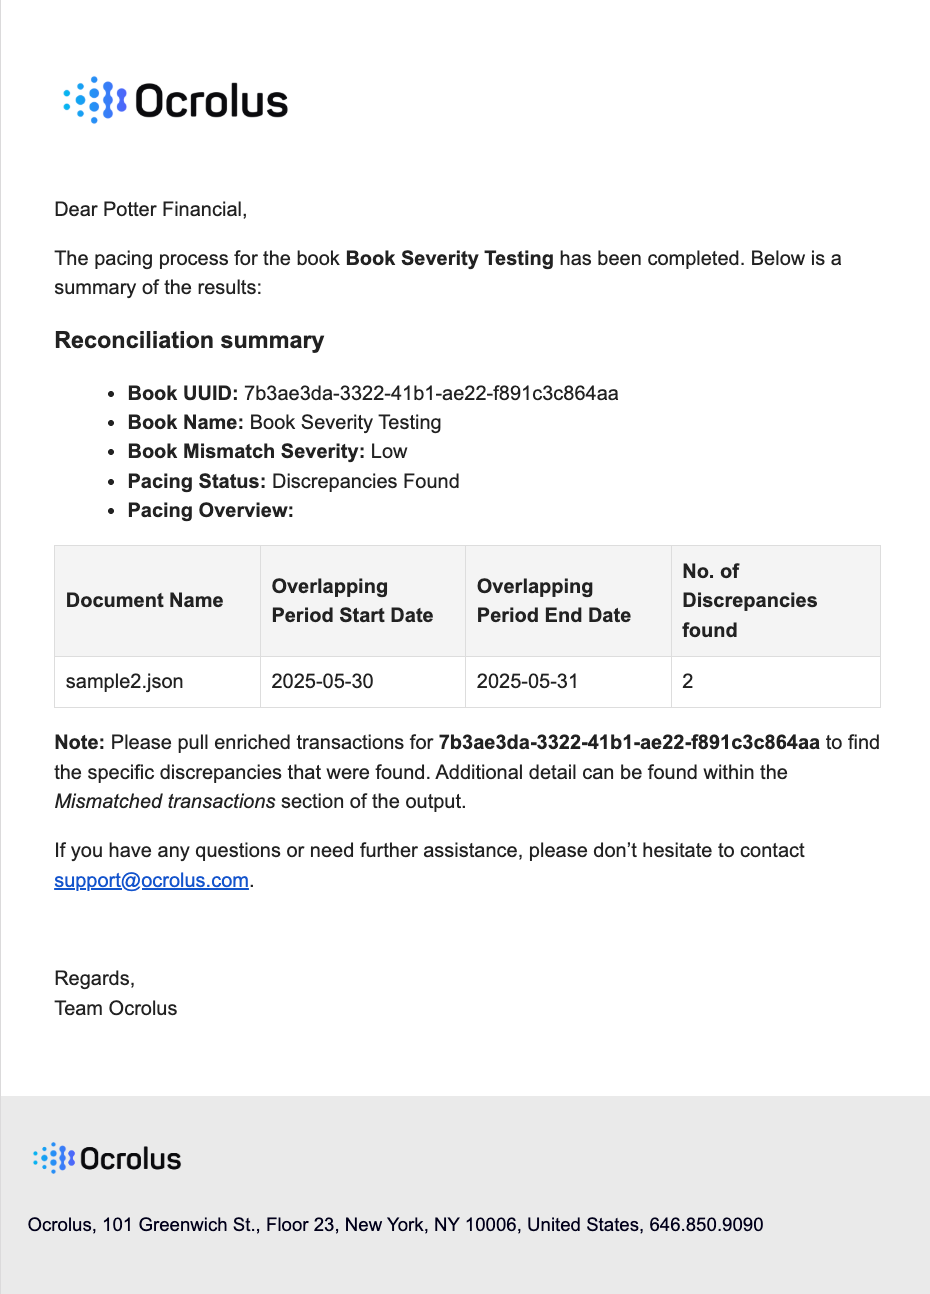
Step 3: Analyze updated insights
Once the matching process is complete, Ocrolus sends a notification summarizing the results. Notifications are delivered via one of the following methods:
-
Webhooks: If no mismatches are found, the
book.pacing.no_discrepancies_foundevent will trigger and notifications are sent confirming that the data from both sources (Bank Statements and Plaid JSON) match. If mismatches are found, the **book.pacing.discrepancies_found** event will trigger and notifications are sent with discrepancies for further action. To learn more about the webhook events, see Webhook events. -
Email summaries: If mismatches are found, an email notification provides an overview of the mismatched transactions for review. The email includes details on discrepancies, enabling users to take the appropriate action.
NoteClients must provide the email addresses where result notifications should be sent. These email IDs should be shared with your Ocrolus Account Manager or Solutions Engineer during onboarding or integration setup. Notifications will be sent only to the specified recipients.
4: Review mismatch transactions
Now that Docs-to-Digital matching is complete, you can analyze the output to review mismatched transactions. To analyze mismatched transactions via API, perform the following steps:
-
Access the Enriched transaction endpoint and refresh the data.
-
Review the **
mismatched_transactions**node, which includes:-
txn_pk: A unique identifier for the transaction. -
txn_date: The date when the transaction occurred. -
description: A brief detail or label associated with the transaction. -
amount: The monetary value of the transaction. -
uploaded_doc_pk: A unique identifier for the uploaded document associated with this transaction. -
uploaded_doc_format: The source of the transaction data, such as BANK_STATEMENT or PLAID. -
severity: Indicates the level of importance or risk associated with the transaction (e.g., low, medium, high). -
reason_code: A string representing the reason or category for a flagged or mismatched transaction. -
related_txn_pk: The unique identifier of a related transaction, used to link associated records. -
tags: Keywords or labels assigned to the transaction for easier classification and filtering (e.g., "fintech", "fintech_loan"). -
counterparty: The name of the counterparty involved in the transaction.
NoteTo learn more about the **
mismatched_transactions** payload, see Enriched transaction endpoint response. -
Updated 3 months ago