
Analyze for mortgage
Analyze uses Ocrolus APIs to calculate income using data extracted from borrower-provided documents. Within the Ocrolus Dashboard, you can review calculations, trace the source of the data, and make any adjustments you need, all without leaving your main system. Ocrolus has partnered with industry experts and its customers to fine-tune these calculations, ensuring they align perfectly with investor guidelines.
Supported income types
Currently, Analyze uses data from the uploaded documents to calculate below types of income:
Ocrolus Dashboard: Income tab
To navigate to the Income tab within the Ocrolus Dashboard, perform the following steps:
-
Log in to the Ocrolus Dashboard.
-
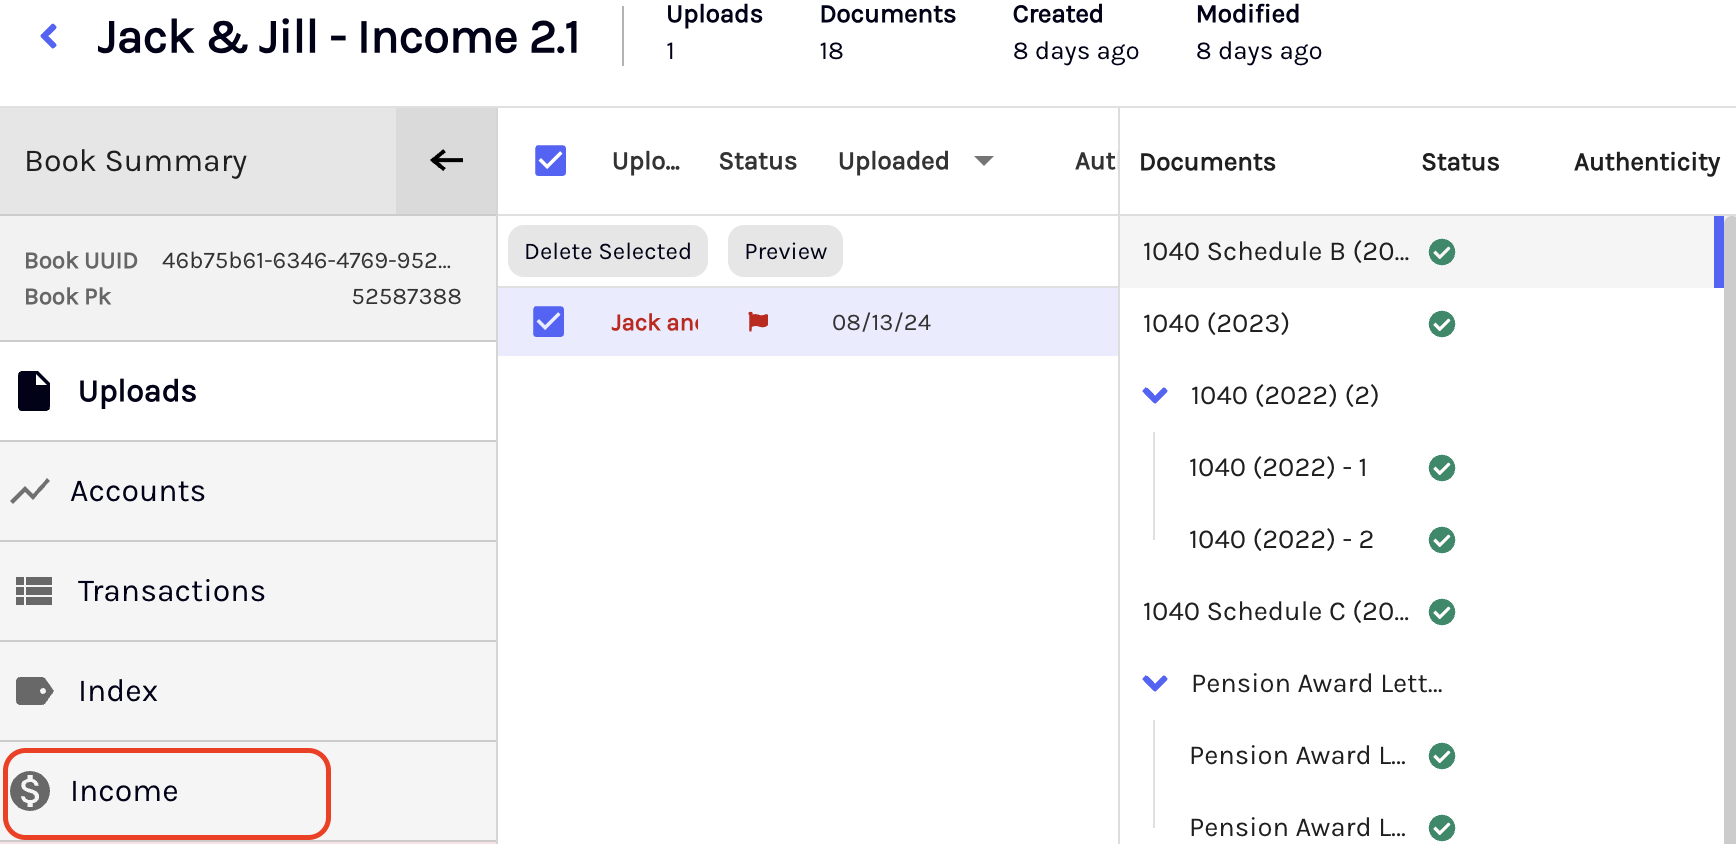
Click on the Book for which you want to view the analyzed result.

-
Click on the Income tab.
-
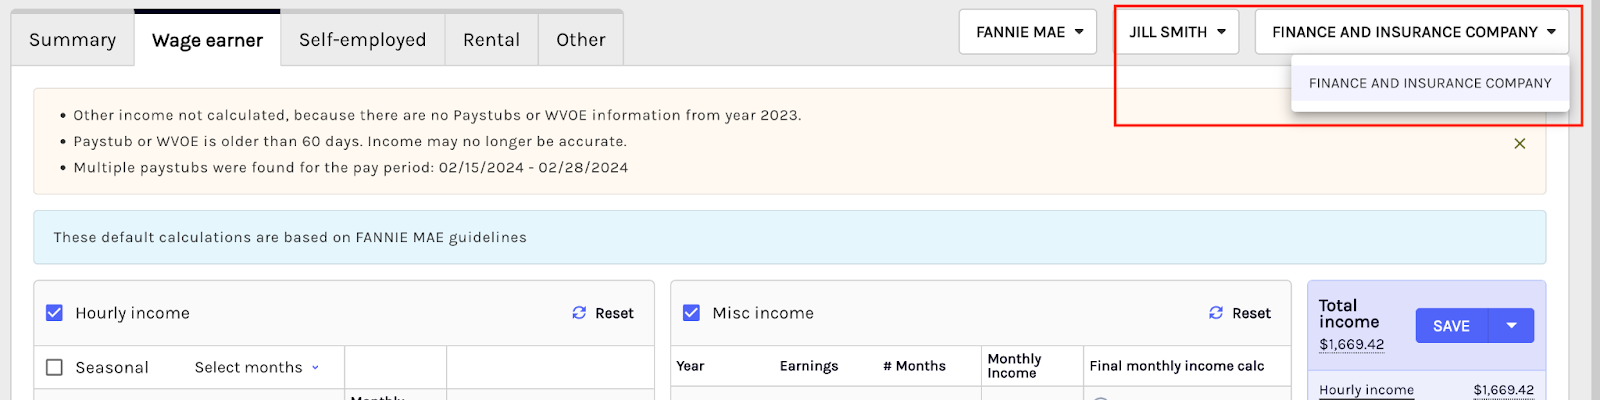
The Income page includes tabs for Wage Earner income, Self-Employed income, Rental income, and Other income. Select the tab that matches the relevant income source for the selected Book. For example, if the income primarily comes from wages, select the Wage Earner tab. If the income is from self-employment, select the Self-Employed tab. If it's rental income, select the Rental tab. If the income doesn't fit any of these categories, select the Other tab.
Aggregated Income Summary
The Income summary page presents a consolidated view of all income types linked with all the borrowers, allowing users to access comprehensive financial information quickly and efficiently.
By clicking on specific income entries, you can drill down into more detailed views to understand individual income streams.
NoteThe income summary page filters out inactive employers or employers with paystubs older than 60 days.
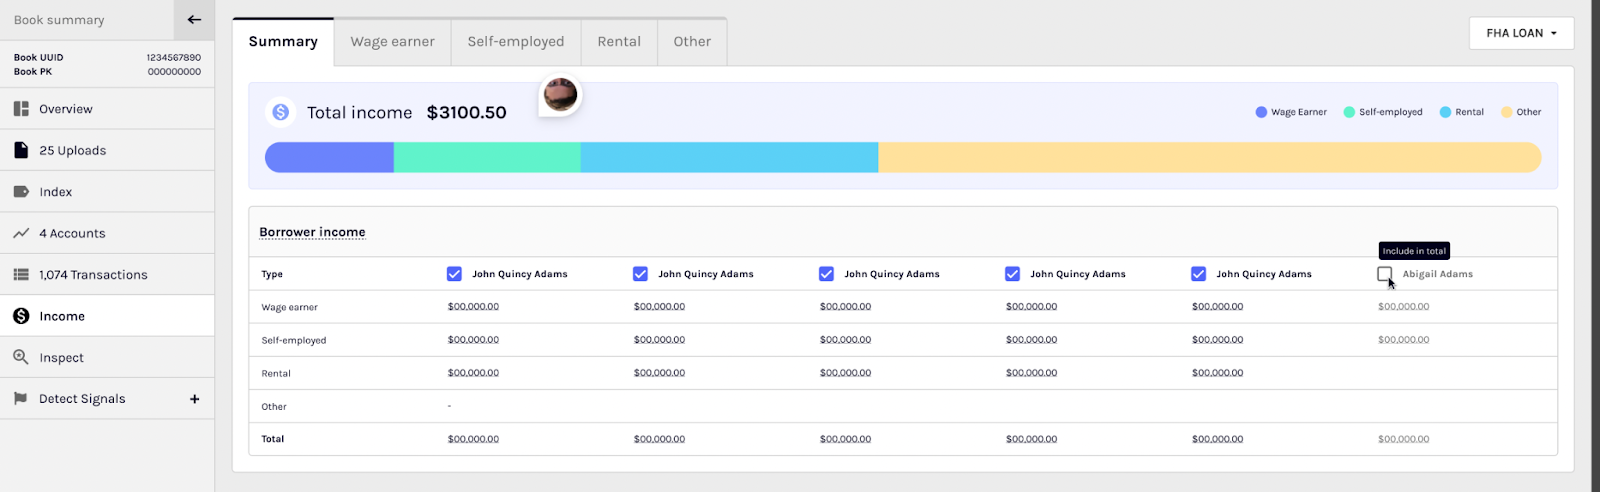
You can also unselect any borrower to be not included in the total income calculation. To include or exclude a borrower from the total book-level income calculation, select or deselect the checkbox next to their name.
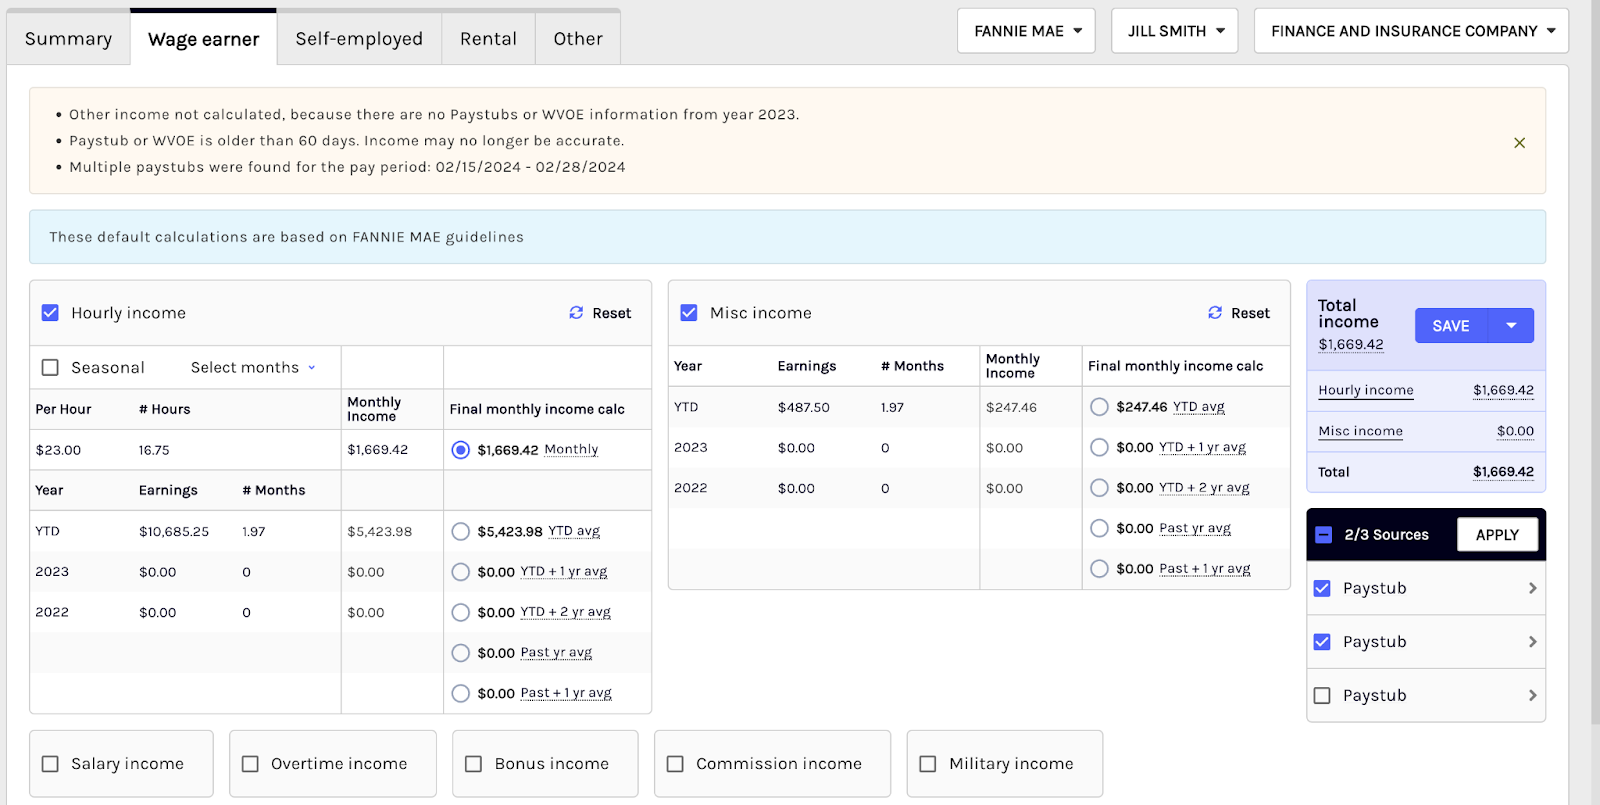
Ocrolus alertsIn some cases, Ocrolus may not be able to calculate information accurately, or even at all for a particular borrower income. When this happens, Ocrolus provides details through alerts and messages.
Selecting income guideline
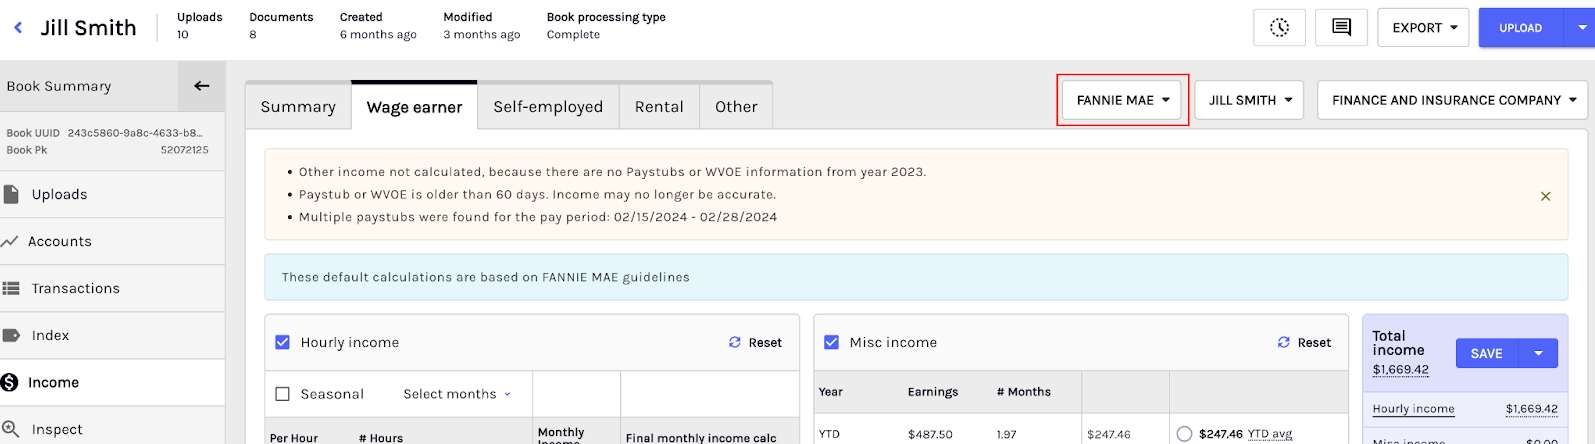
Ocrolus Analyze allows you to verify and update the underwriting guidelines used for income calculations. Ocrolus supports calculations based on Fannie Mae, Freddie Mac, FHA, VA, and USDA loan guidelines.
For Encompass customers, Ocrolus will pull the program details from the loan and automatically recommend the calculation based on the given guidelines. Whereas, for non-Encompass customers, Ocrolus will default the calculations based on Fannie Mae guidelines. You may then control the program through a dropdown within the Ocrolus Dashboard.
If you determine that an alternative guideline is more appropriate, then you can easily update it using the program dropdown within the Analyze interface. Upon selecting a different guideline, Ocrolus recalculates the borrower’s income based on the requirements of the newly selected program guidelines. This ensures that income calculations align accurately with the loan program being underwritten.
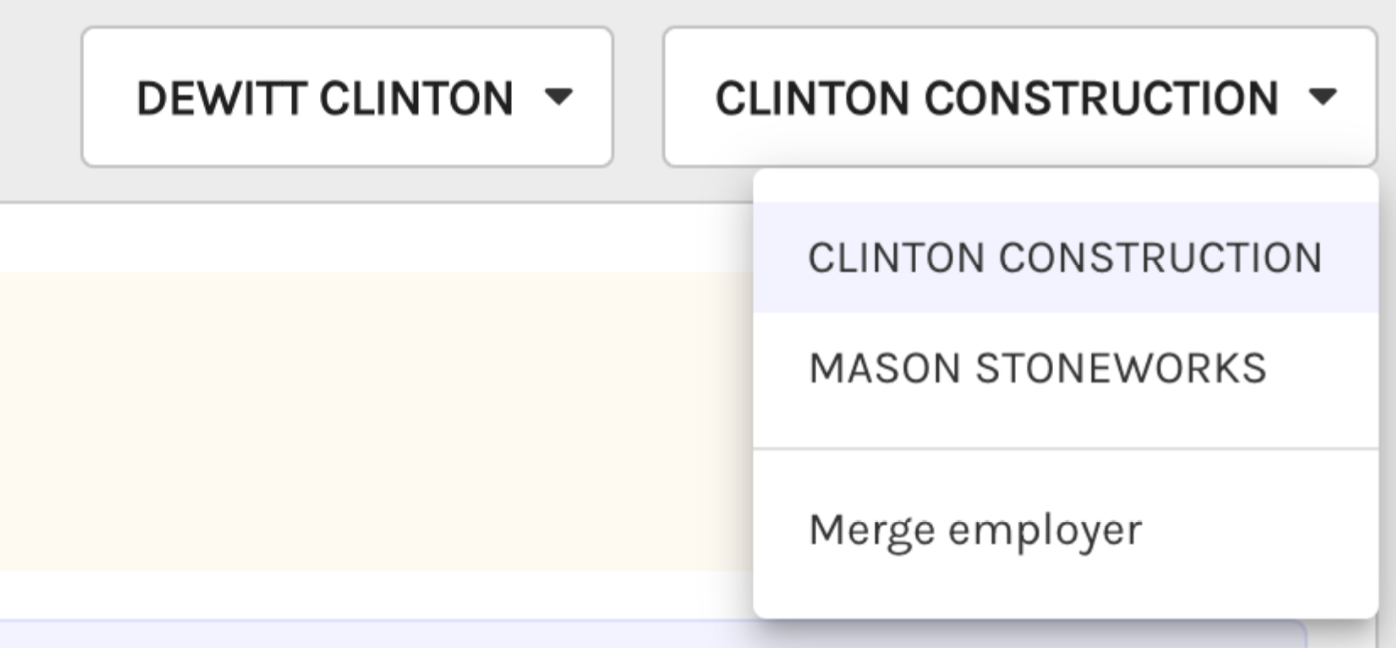
Multiple borrowers and employers
In cases where multiple borrowers are identified through the documents uploaded in Ocrolus, income is calculated separately for each borrower-employer pair. These pairs will be visible in the relevant Wage Earner or Self-Employed tab and can be accessed using the dropdown menu.
Merge borrowers, employers, and properties
In rare instances, Ocrolus might fail to recognize that two different variations of an employer's or a person's name refer to the same entity. In such cases, Ocrolus provides an option to manually merge these name variants. After merging, the calculations can be rerun using all related documents.
To merge two employers or two persons, perform the following steps:
-
Select the Merge employer option from the dropdown.
-
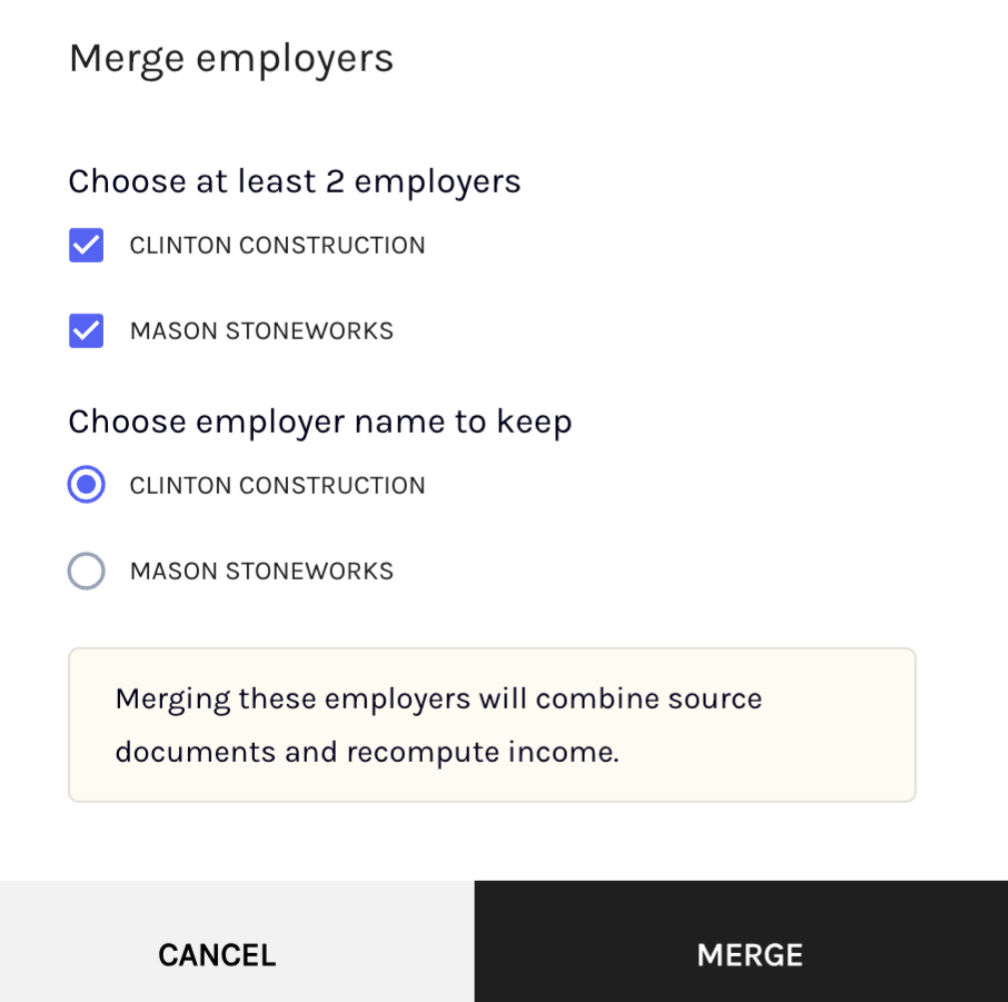
Once the pop-up window appears, select the names you would like to merge and then select the entity name you would like to keep as the correct source.
-
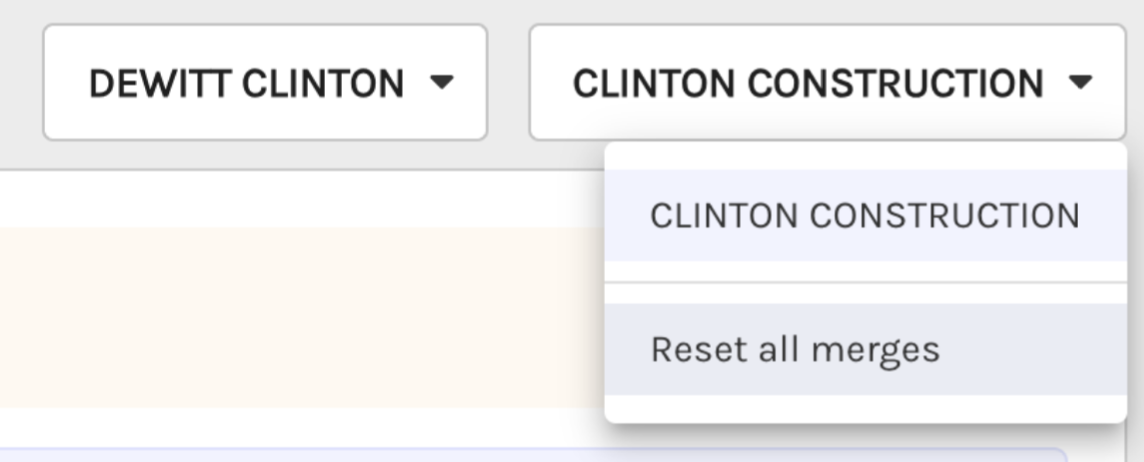
Once merging is complete, the system will automatically rerun the using the relevant documents related to the merged entity. You can always reset this merge function by clicking on the dropdown and selecting Reset all merges.
Checking the source document
On the right side of the income calculation, a panel displays the document sources utilized for each borrower and employer/business pair during the income evaluation. You can opt to include or exclude income sources anytime using the checkboxes.
For example, if you’re reviewing the Book in April and the latest tax forms become available, you can deselect the outdated year, select the updated version(s), and click Apply to recalculate the income using the newly selected sources.
In the below screenshot, the Sources navigation panel displays the documents used for the given income evaluation. Some light descriptions are provided to best differentiate between each form. Checkboxes are displayed on the left-hand side of the form name, which allows you to exclude or include the given source in the income evaluation.
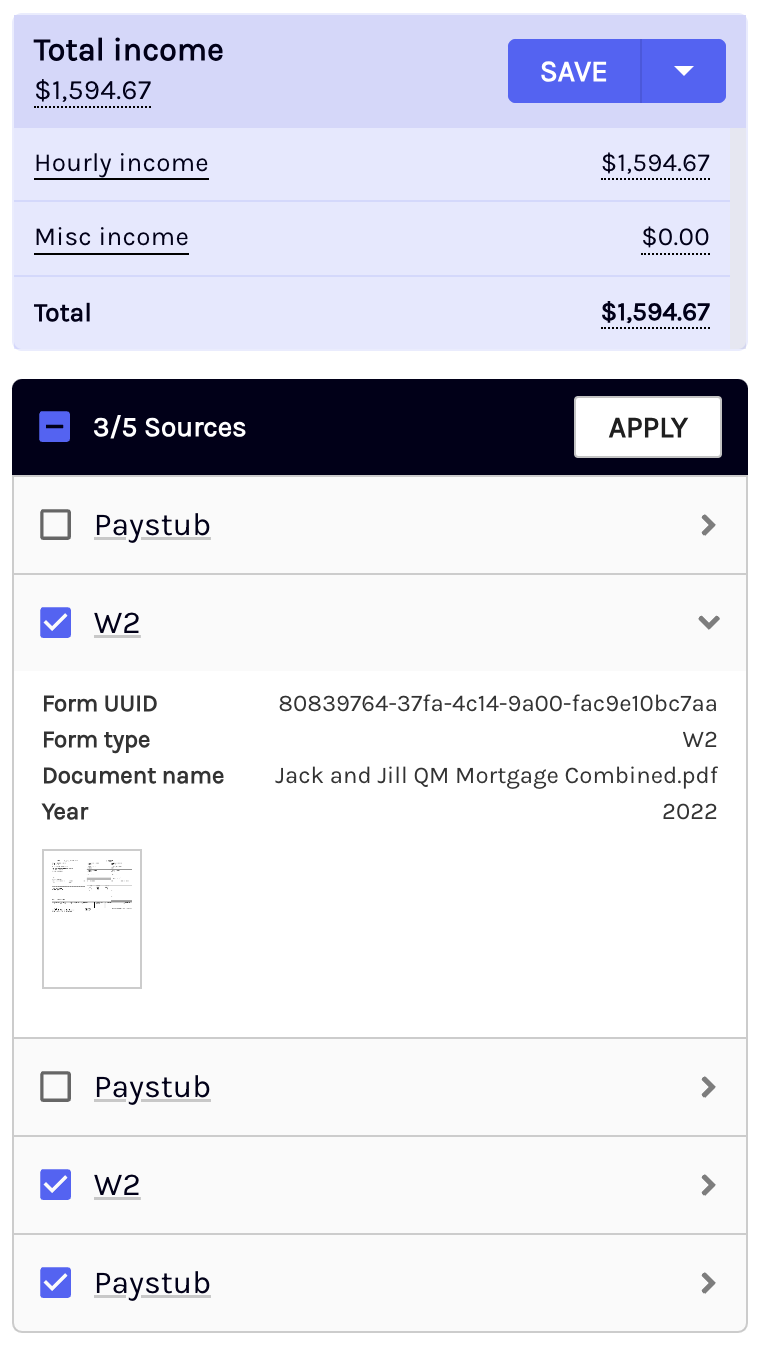
You can also inspect the documents more closely via a hover feature, or a full-page view by clicking on the hovered image.
View data origin
When hovering over any prefilled input value within the worksheet, you will see a hovered image of the data source and an option to Click to view origin. When you click on the value, an image will appear of the document from which it was extracted, with the value highlighted on the image for quick recognition. This allows end users to check the source of each input value, ensuring data accuracy and integrity.
Editing values
There are multiple ways of editing values and income computation within the dashboard. Such as:
-
By modifying the input source: By adjusting the input source, you can select the documents to be utilized for the calculation. Refer to the Checking the source material section for detailed information on how to modify input sources to regenerate income.
-
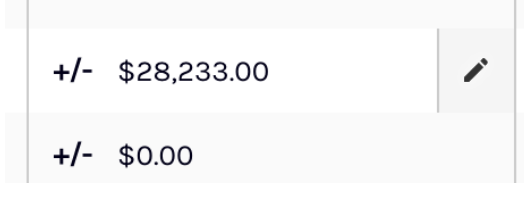
By editing values directly: Any data field within the income worksheet can be modified. When hovering over a field within the worksheet, you will see a pencil icon on the right side of the cell. Click within the cell to modify the calculation.
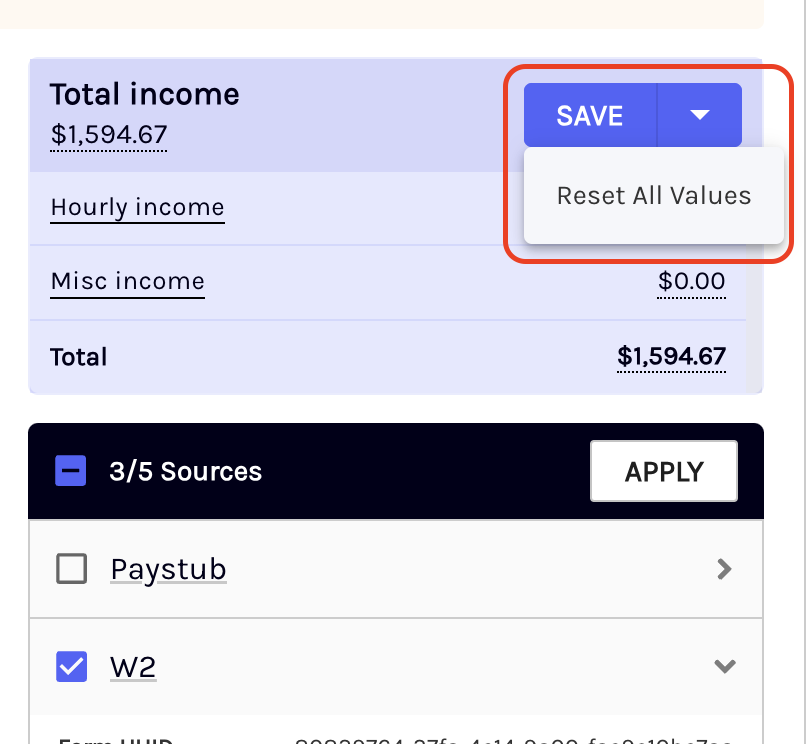
While making modifications to input values, all applicable calculations will automatically be modified. To save your changes, click the Save button in the upper right-hand corner. You can also reset all the values if required by clicking on the Reset All Values from the dropdown list.
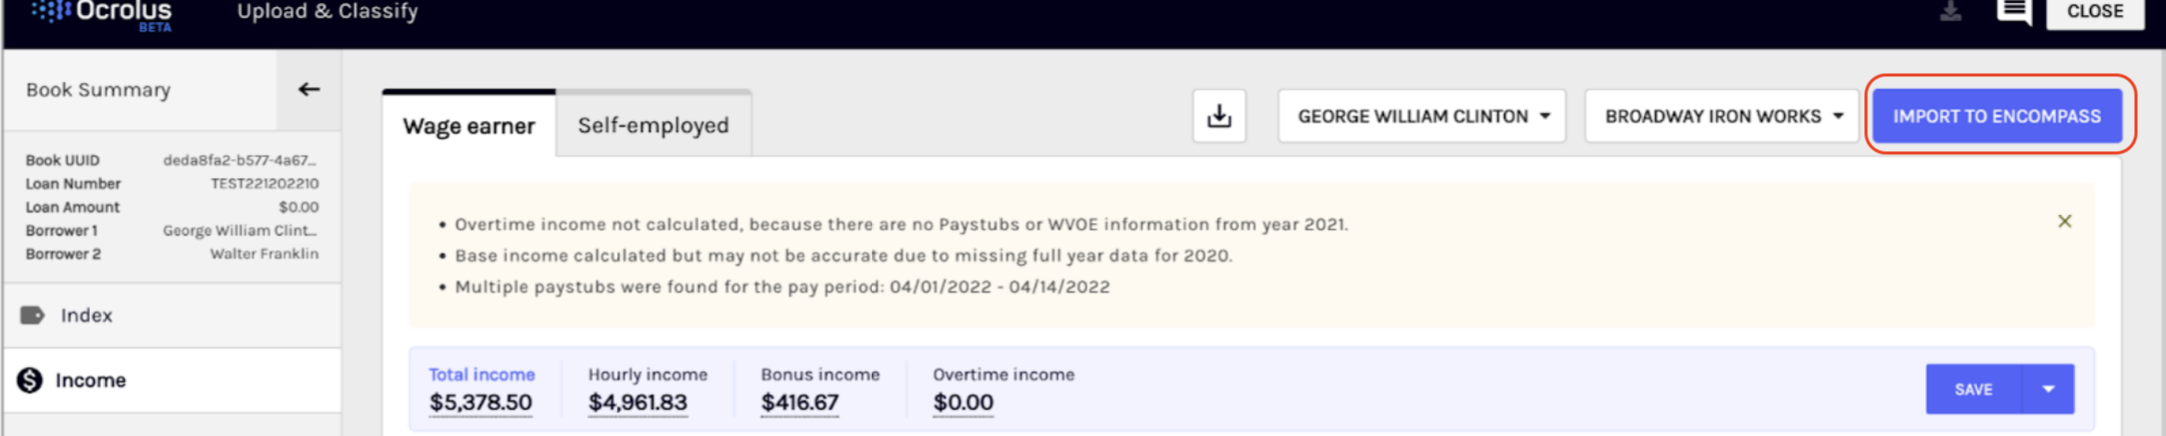
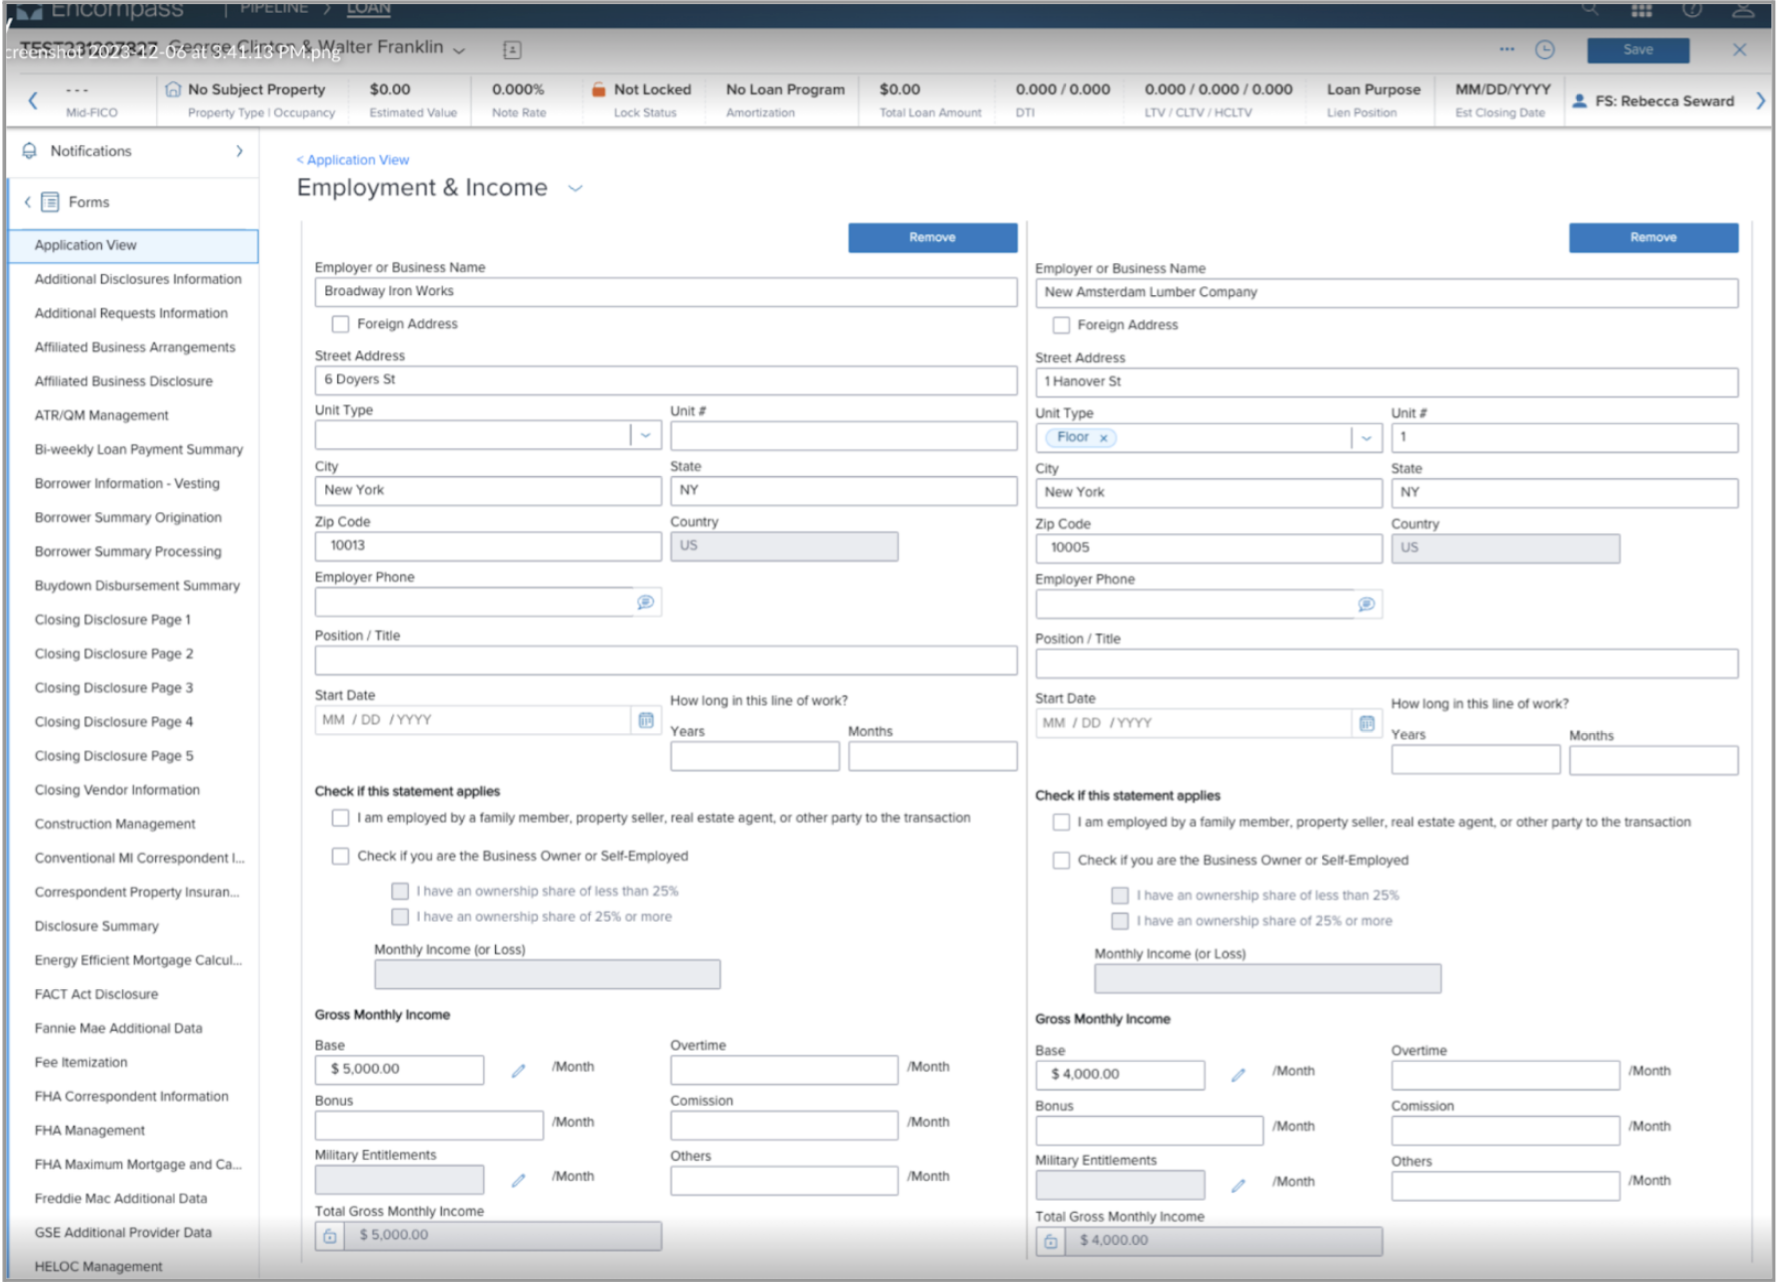
Import income into Encompass
With Ocrolus for mortgage lenders, users using the Analyze solution for income calculations, and the integration with Encompass LOS can import income values directly into Encompass Verification of Employment (VOE) fields. The import of income calculated by Ocrolus will update existing VOE entries for any existing employment and provide you the ability to create new VOE entries in Encompass using the Ocrolus Dashboard.
Import income values for existing employees
To write back income values to the Encompass Verification of Employment fields, perform the following steps:
-
Click the IMPORT TO ENCOMPASS button.
-
The Import to Encompass popup appears. Evaluate existing Encompass data against Ocrolus income data within the popup.
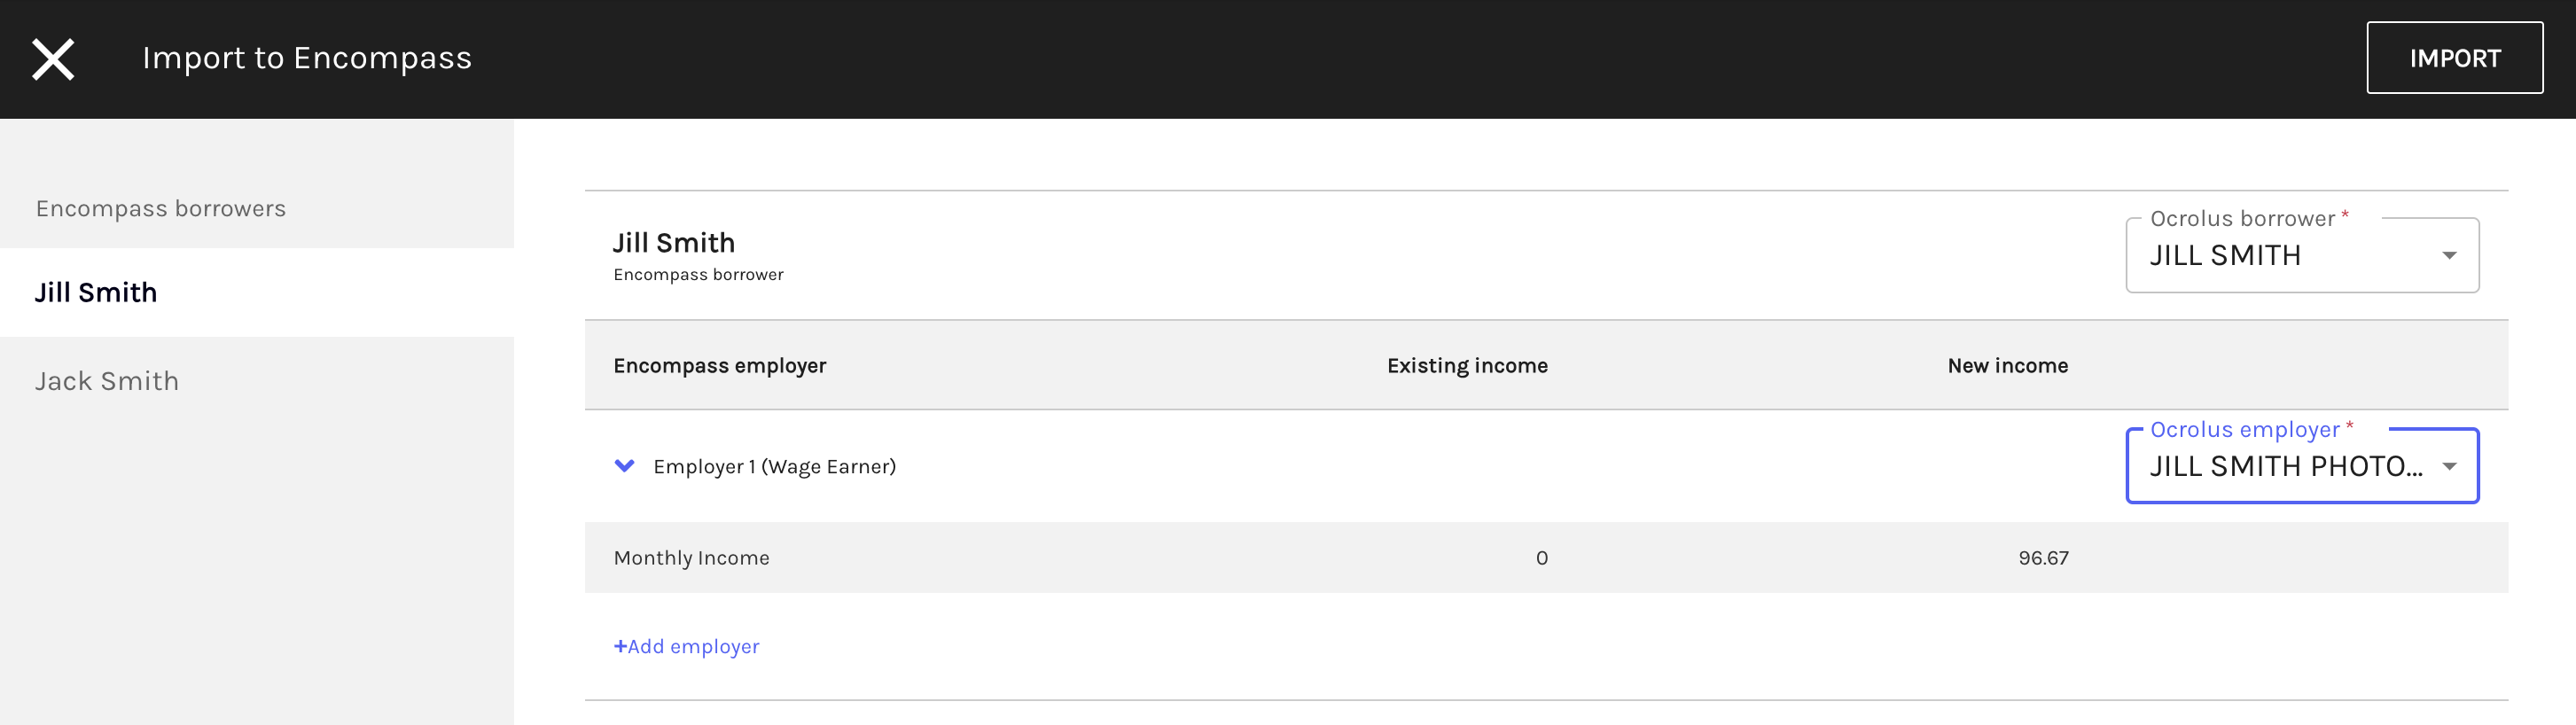
-
From the Ocrolus dropdown menu in the popup, select the appropriate borrower and employer mappings for which you intend to import income.
-
Verify the presence of existing income values in Encompass for the selected Verification of Employment (VOE) entry. This will allow you to designate which values will be overridden upon import.
-
Click the Import button to initiate the import process.
-
Once the import operation is complete, verify that the values have been successfully updated in the Encompass VOE data fields.
Create a new employer
In case Ocrolus has identified more employers than the ones present in Encompass, you can add a new VOE entry from the Ocrolus Dashboard.
To create a new employer, perform the following steps:
-
Click on the Add Employer option within the Import modal and add the new employer name.
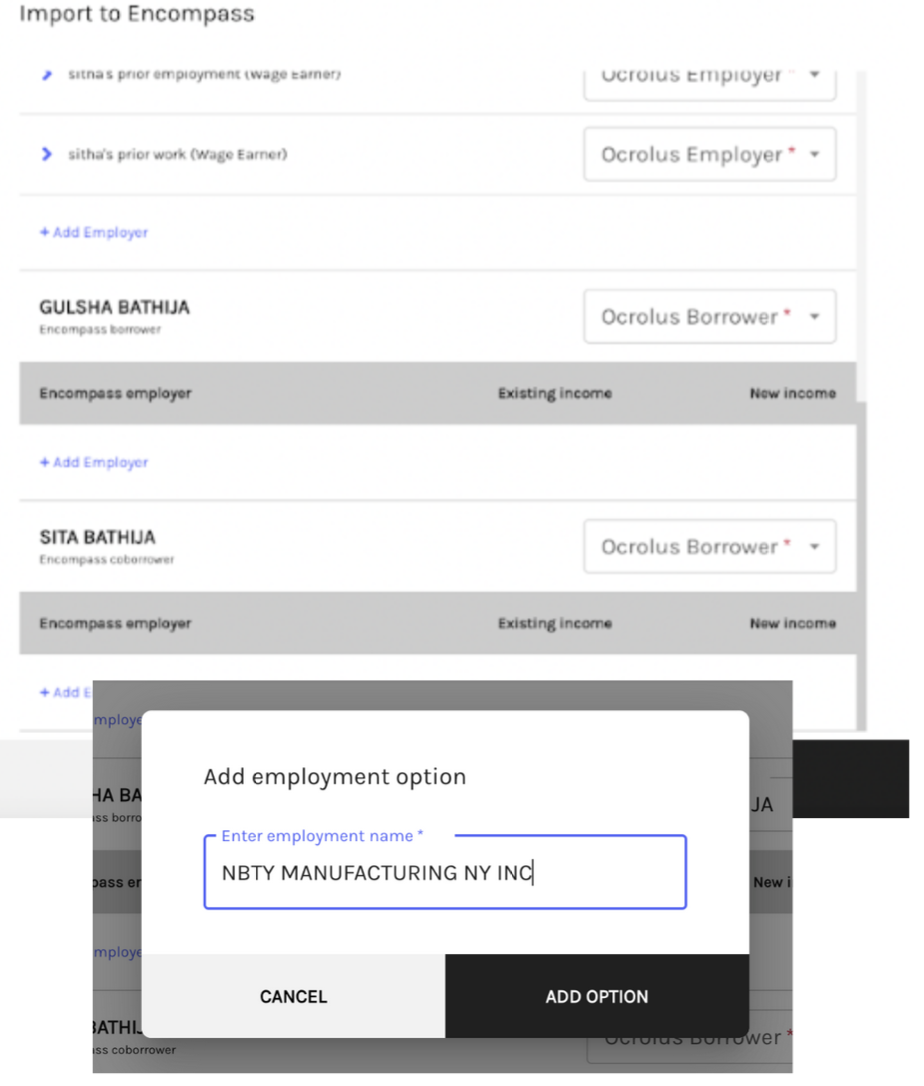
-
Once the new employer is entered, you will be able to map any of the Ocrolus-identified employers to this name and import the values back into Encompass.
-
Once the new employment is added, you will follow the same steps above to verify information successfully imported to Encompass VOE fields.
Import of Analyze PDF directly into Encompass eFolder
Use this feature to streamline your document-handling workflow in Encompass. From the Encompass Dashboard, you can import Analyze PDFs directly into the Encompass eFolder. Before importing, go to the self-service Encompass mapping page to predefine the destination folder so files land in the correct folder automatically. This eliminates manual download/upload steps, reduces errors, and accelerates document processing across your lending workflow.
To import a PDF into the Encompass eFolder, the system requires a lock on the loan file. If the loan is currently open in Encompass, the import will not proceed. In such a case, you must exit the loan file so Ocrolus can obtain the lock and push the documents into the eFolder.
This feature offers:
- Direct import via EPC APIs: Import Analyze PDFs directly into the Encompass eFolder, eliminating manual download/upload steps.
- Configurable eFolder destinations: Use self-service taxonomy mapping to set and update the target eFolder (tab/folder) for income PDFs as needed.
- Error handling: If an import fails, the system returns a clear error so lenders can identify and address issues immediately.
To set the destination folder, perform the following steps:
Step 1: Set the eFolder destination (in Ocrolus)
-
In the Ocrolus Dashboard, open Encompass import options.
-
Under the Encompass import options section, specify the eFolder destination for your Analyze PDFs where the PDF should be stored.
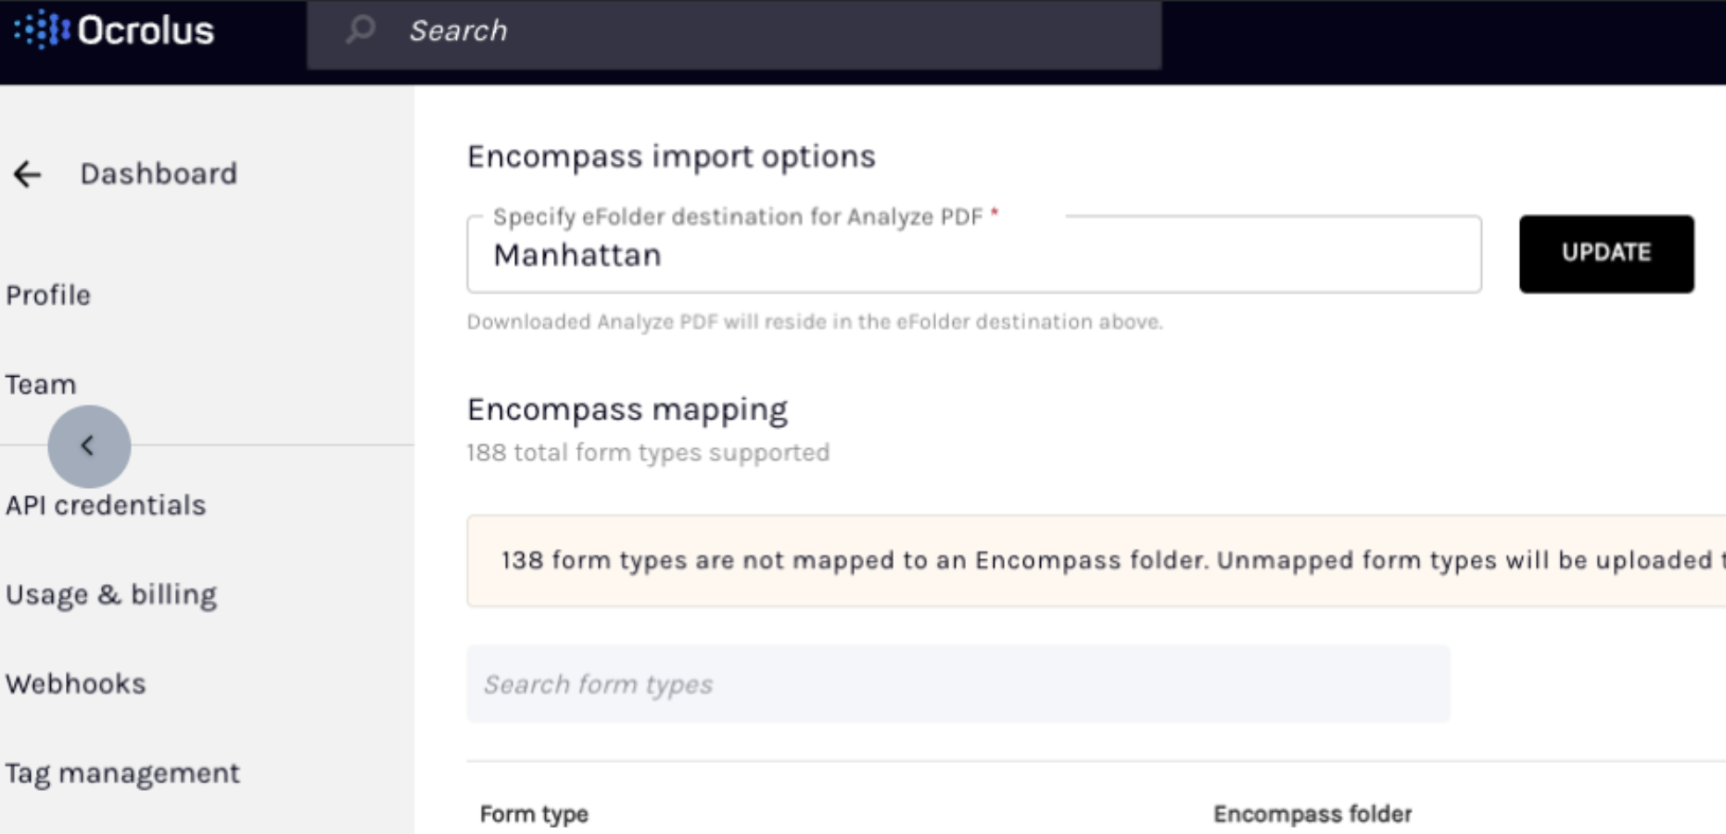
-
Click UPDATE to save your selection. Optionally, you can change the destination anytime. The new imports will use the latest saved mapping.
Step 2: Import the Analyze PDF to Encompass
-
Go to your Analyze PDFs list in the Ocrolus Dashboard.
-
Open the actions menu for the desired file and select Download to e-Folder.
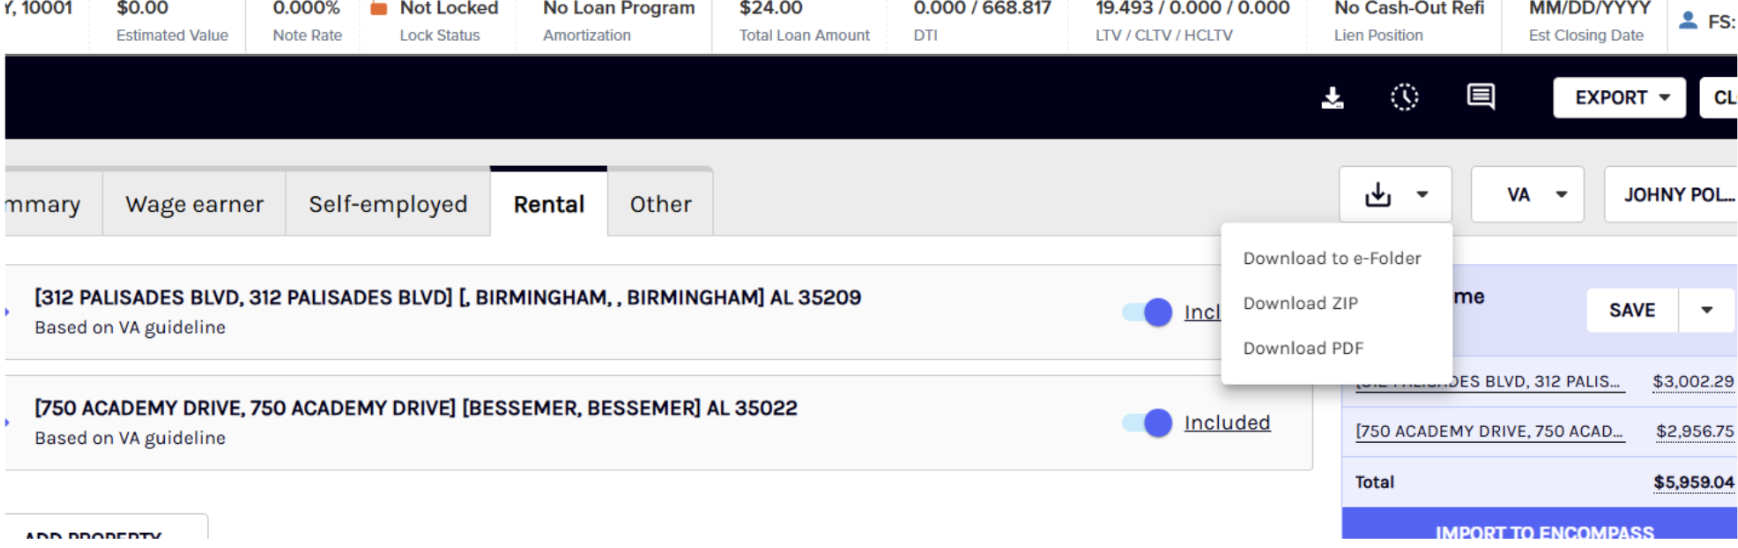
-
Wait for the confirmation message that the import has started/completed.
-
The PDF is routed to the destination you set in Step 1.
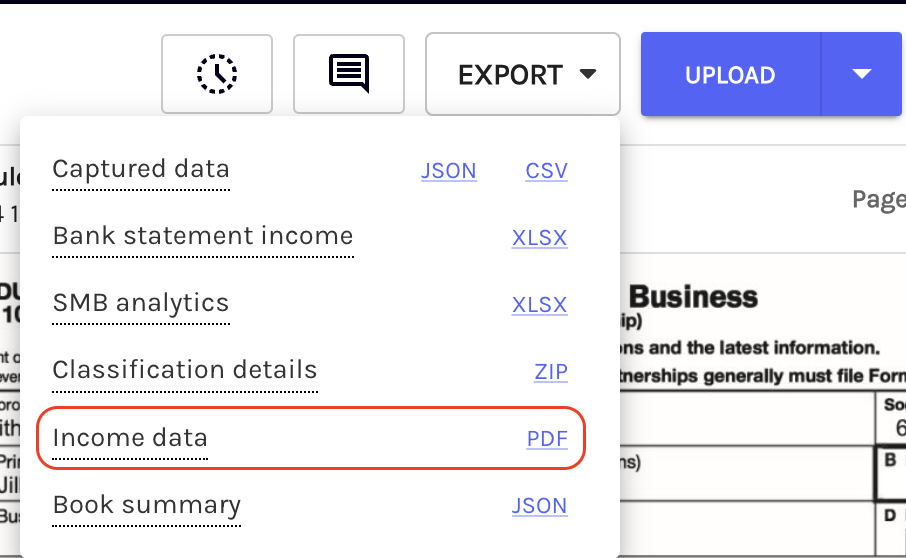
Export the worksheet
To print a PDF copy of the worksheet, click the Export dropdown menu and select the PDF link for Income Data. This will print a PDF copy of the complete worksheet, including copies of the supported sources used for the income calculation.
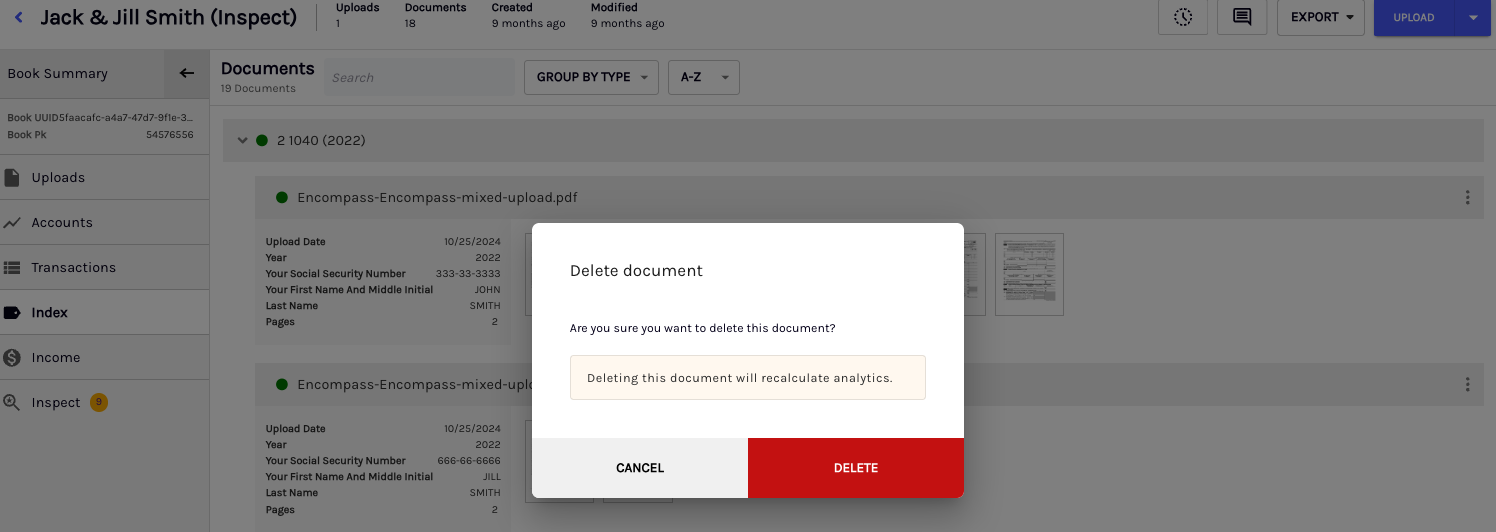
Deleting documents from the Dashboard
To help you manage your loan files more effectively, the Dashboard supports deleting individual documents directly from the UI. This allows you to correct accidental uploads, remove irrelevant or sensitive files, and ensure a clean handoff to underwriting.
To delete a document from the Dashboard, perform the following steps:
-
Log in to the Dashboard and click on the Book from the Book list page.
-
Select the Index tab and locate the document you want to delete.
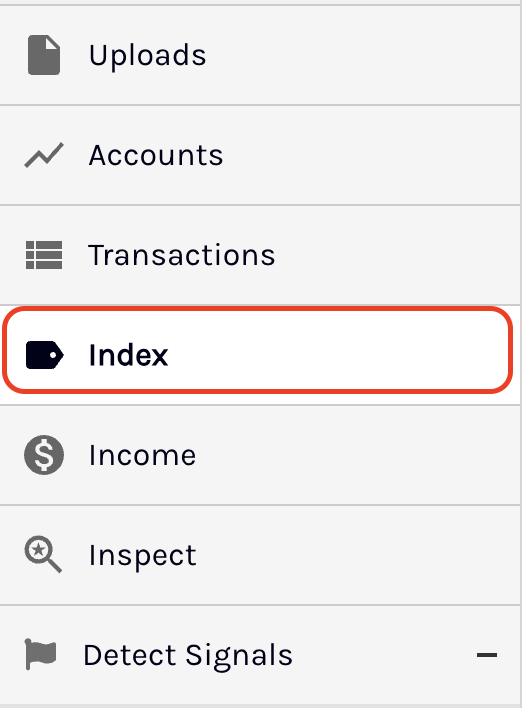
-
Select the three-dot menu (⋮) beside the document and then choose Delete document.
-
A confirmation pop-up Are you sure you want to delete this document? appears. Click DELETE to proceed.
-
Validate the deletion. The document is immediately hidden from the list but remains accessible through backend systems and API responses for audit and debugging purposes.
Updated 12 days ago